Object detector in SwiftUI with UIKit
In the last post, we developed an app that shows a live camera feed on the screen in all orientations. This post extends the app with an object detection model.
To achieve this we add a pixel buffer as second output to the capture session. Then, we grab a frame from the buffer, process it with the model, and draw a bounding box for each detection on the screen. The box is overlayed over the live camera feed.
By handling the detection separate from the camera feed, we can downscale a frame before we detect the objects in it and also skip frames if the detection processes are too slow while maintaining a smooth and high resolution live camera feed.
You can get the code to follow along here.
Here is a video version of this post.
Extending view controller
To keep the code for the detector separate from the code for the preview, we create a new file Detector.swift and extend our ViewController class. We also import UIKit, AVFoundation, and Vision.
import UIKit
import AVFoundation
import Vision

extension ViewController {

}
We will see later why we cannot use a separate class here.
Adding pixel buffer output
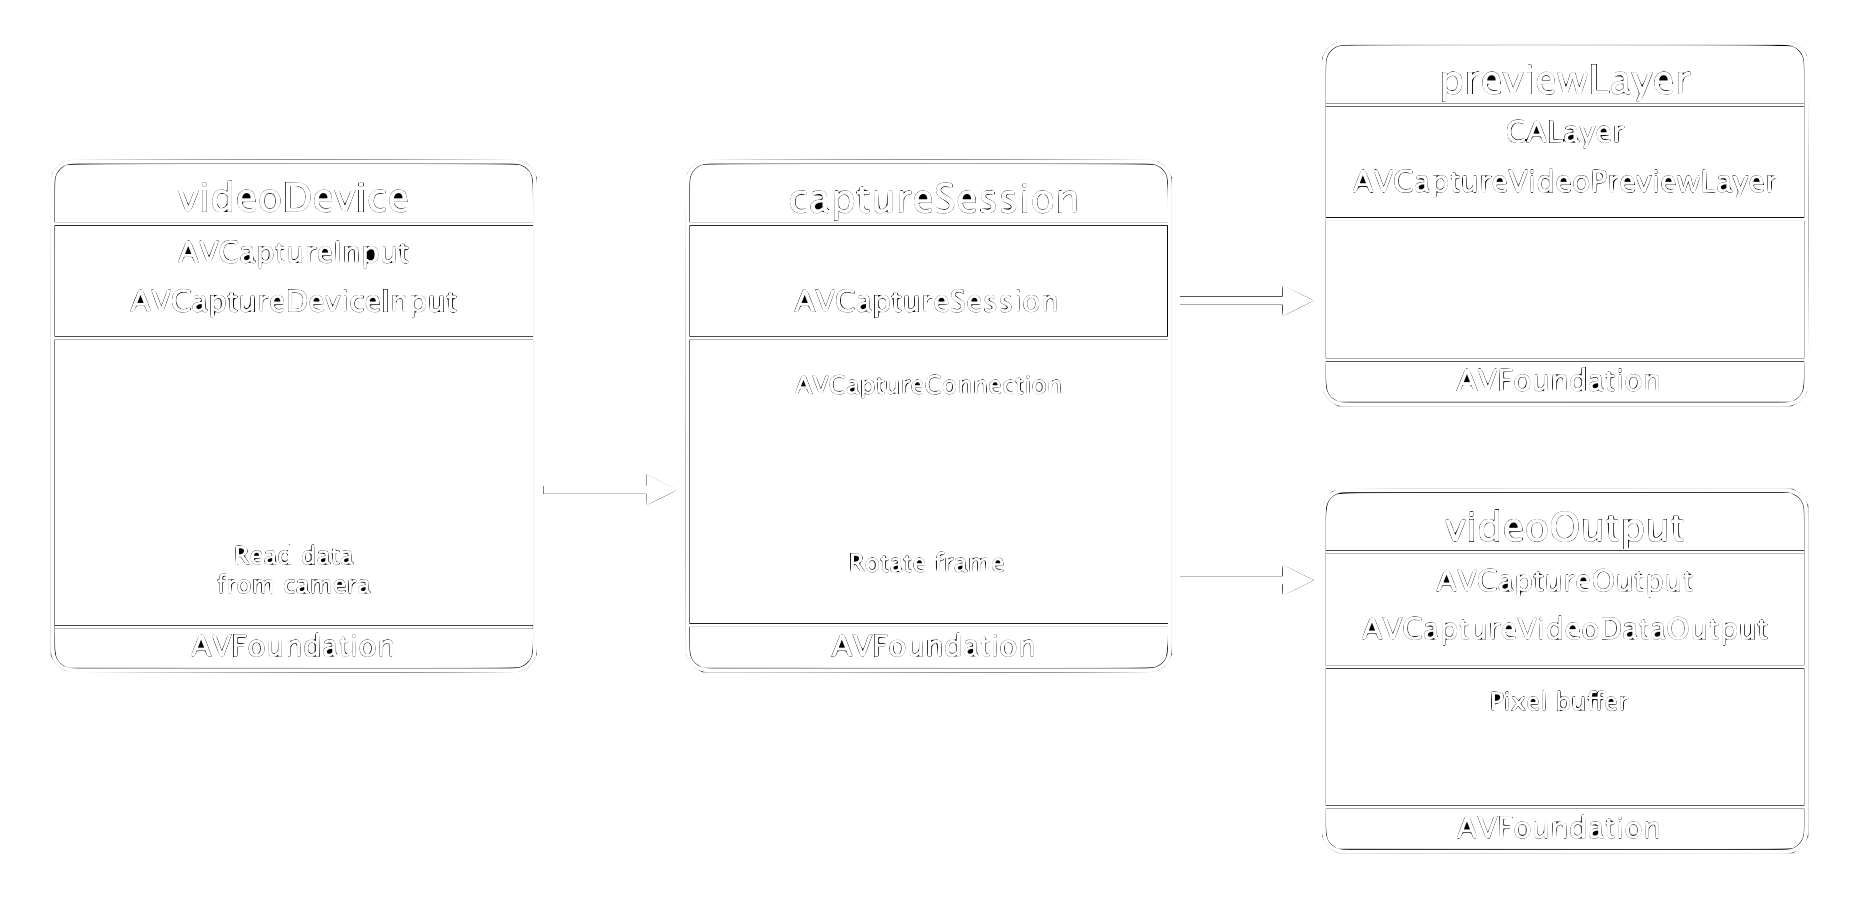
To get access to the frames from the camera we add an AVCaptureVideoDataOutput as a second output to our capture session, see figure 1.
To implement this, we first create the instance variable videoOutput in our ViewController class (in the file ViewController.swift).
// For detector
private var videoOutput = AVCaptureVideoDataOutput()
Then, in the function setupCaptureSession we set the class ViewController as the buffer delegate and connect this output to our captureSession. This delegate is why we chose to extend the class and cannot use a new one. It allows us to read frames with the captureOutput method from the buffer. I have a video where I explain how this works in more detail.
// Detector
videoOutput.setSampleBufferDelegate(self, queue: DispatchQueue(label: "sampleBufferQueue"))
captureSession.addOutput(videoOutput)
This will throw an error since the ViewController class does not conform to the AVCaptureVideoDataOutputSampleBufferDelegate protocol, so we add:
class ViewController: UIViewController, AVCaptureVideoDataOutputSampleBufferDelegate {
}
Finally, as for the preview layer in the previous post, we rotate the frame in the capture session into portrait orientation.
videoOutput.connection(with: .video)?.videoOrientation = .portrait
Adding model file to project
As a next step, we import a detection model into our project. In the example I use the YOLOv3 model YOLOv3TinyInt8LUT from Apple, but any object detection model will do. We can also convert models from TensorFlow or PyTorch into the CoreML format by using coremltools. This post from my collaborator shows how to do this for YOLOv5 as an example.
To import a model into the project, just drag it into the file navigation area of Xcode and select copy all if prompted, see figure 2.
When you add a model to your project, Xcode creates a class with the name of the file for you, see figure 2 bottom. This is how we can interface with it in our app.
Initializing model
To work with the model, we first define the instance variable requests in the view controller. This array will contain the VNRequest which sends a frame through the model.
var requests = [VNRequest]()
To load and prepare the model we implement the function setupDetector in the file Detector.swift. In it, we first get the path to our model and then load it.
func setupDetector() {
    let modelURL = Bundle.main.url(forResource: "YOLOv3TinyInt8LUT", withExtension: "mlmodelc")
    do {
        let visionModel = try VNCoreMLModel(for: MLModel(contentsOf: modelURL!))
        let recognitions = VNCoreMLRequest(model: visionModel, completionHandler: detectionDidComplete)
        self.requests = [recognitions]
    } catch let error {
        print(error)
    }
}
In line 5 we define our VNCoreMLRequest which tells a vision request which model to use and which completion handler to call once a detection has completed. The result of the detection is assigned to recognitions which we assign to our instance variable requests.
The function setupDetector must be called once before we want to detect objects. That is why we call it in viewDidLoad of the view controller after setupCaptureSession.
Setting up handler
To use the model, we must create a VNImageRequestHandler. This is a handler which grabs a frame from a pixel buffer. Then, we can perfrom object detection on this frame by calling the method .perform() on this handler with requests as argument.
Previously, we set the view controller as the sample buffer delegate. That means that whenever a new frame is provided by the capture session, the method captureOutput is called and the frame is added to a pixel buffer. So in our extension we implement:
func captureOutput(_ output: AVCaptureOutput, didOutput sampleBuffer: CMSampleBuffer, from connection: AVCaptureConnection) {
    guard let pixelBuffer = CMSampleBufferGetImageBuffer(sampleBuffer) else { return }
    let imageRequestHandler = VNImageRequestHandler(cvPixelBuffer: pixelBuffer, orientation: .up, options: [:])

    do {
        try imageRequestHandler.perform(self.requests)
    } catch {
        print(error)
    }
}
Whenever we get a new frame, this handler takes it and runs the object detection model on it. The results are then added to the variable requests.
Handling results
To process the results, we implement the completion handler detectionDidComplete in the extension. We use it to check whether objects were detected in the frame and if so call a function to draw the boxes on the screen. Because of this last operation, we must perform this on the main queue.
The detections are in a list of dictionaries which can be extracted with .results. They are of type VNObservation. If any objects are detected (a frame could contain no objects), we extract them to draw the bounding box in the function extractDetections.
func detectionDidComplete(request: VNRequest, error: Error?) {
    DispatchQueue.main.async(execute: {
        if let results = request.results {
            self.extractDetections(results)
        }
    })
}
Setting up layers for boxes
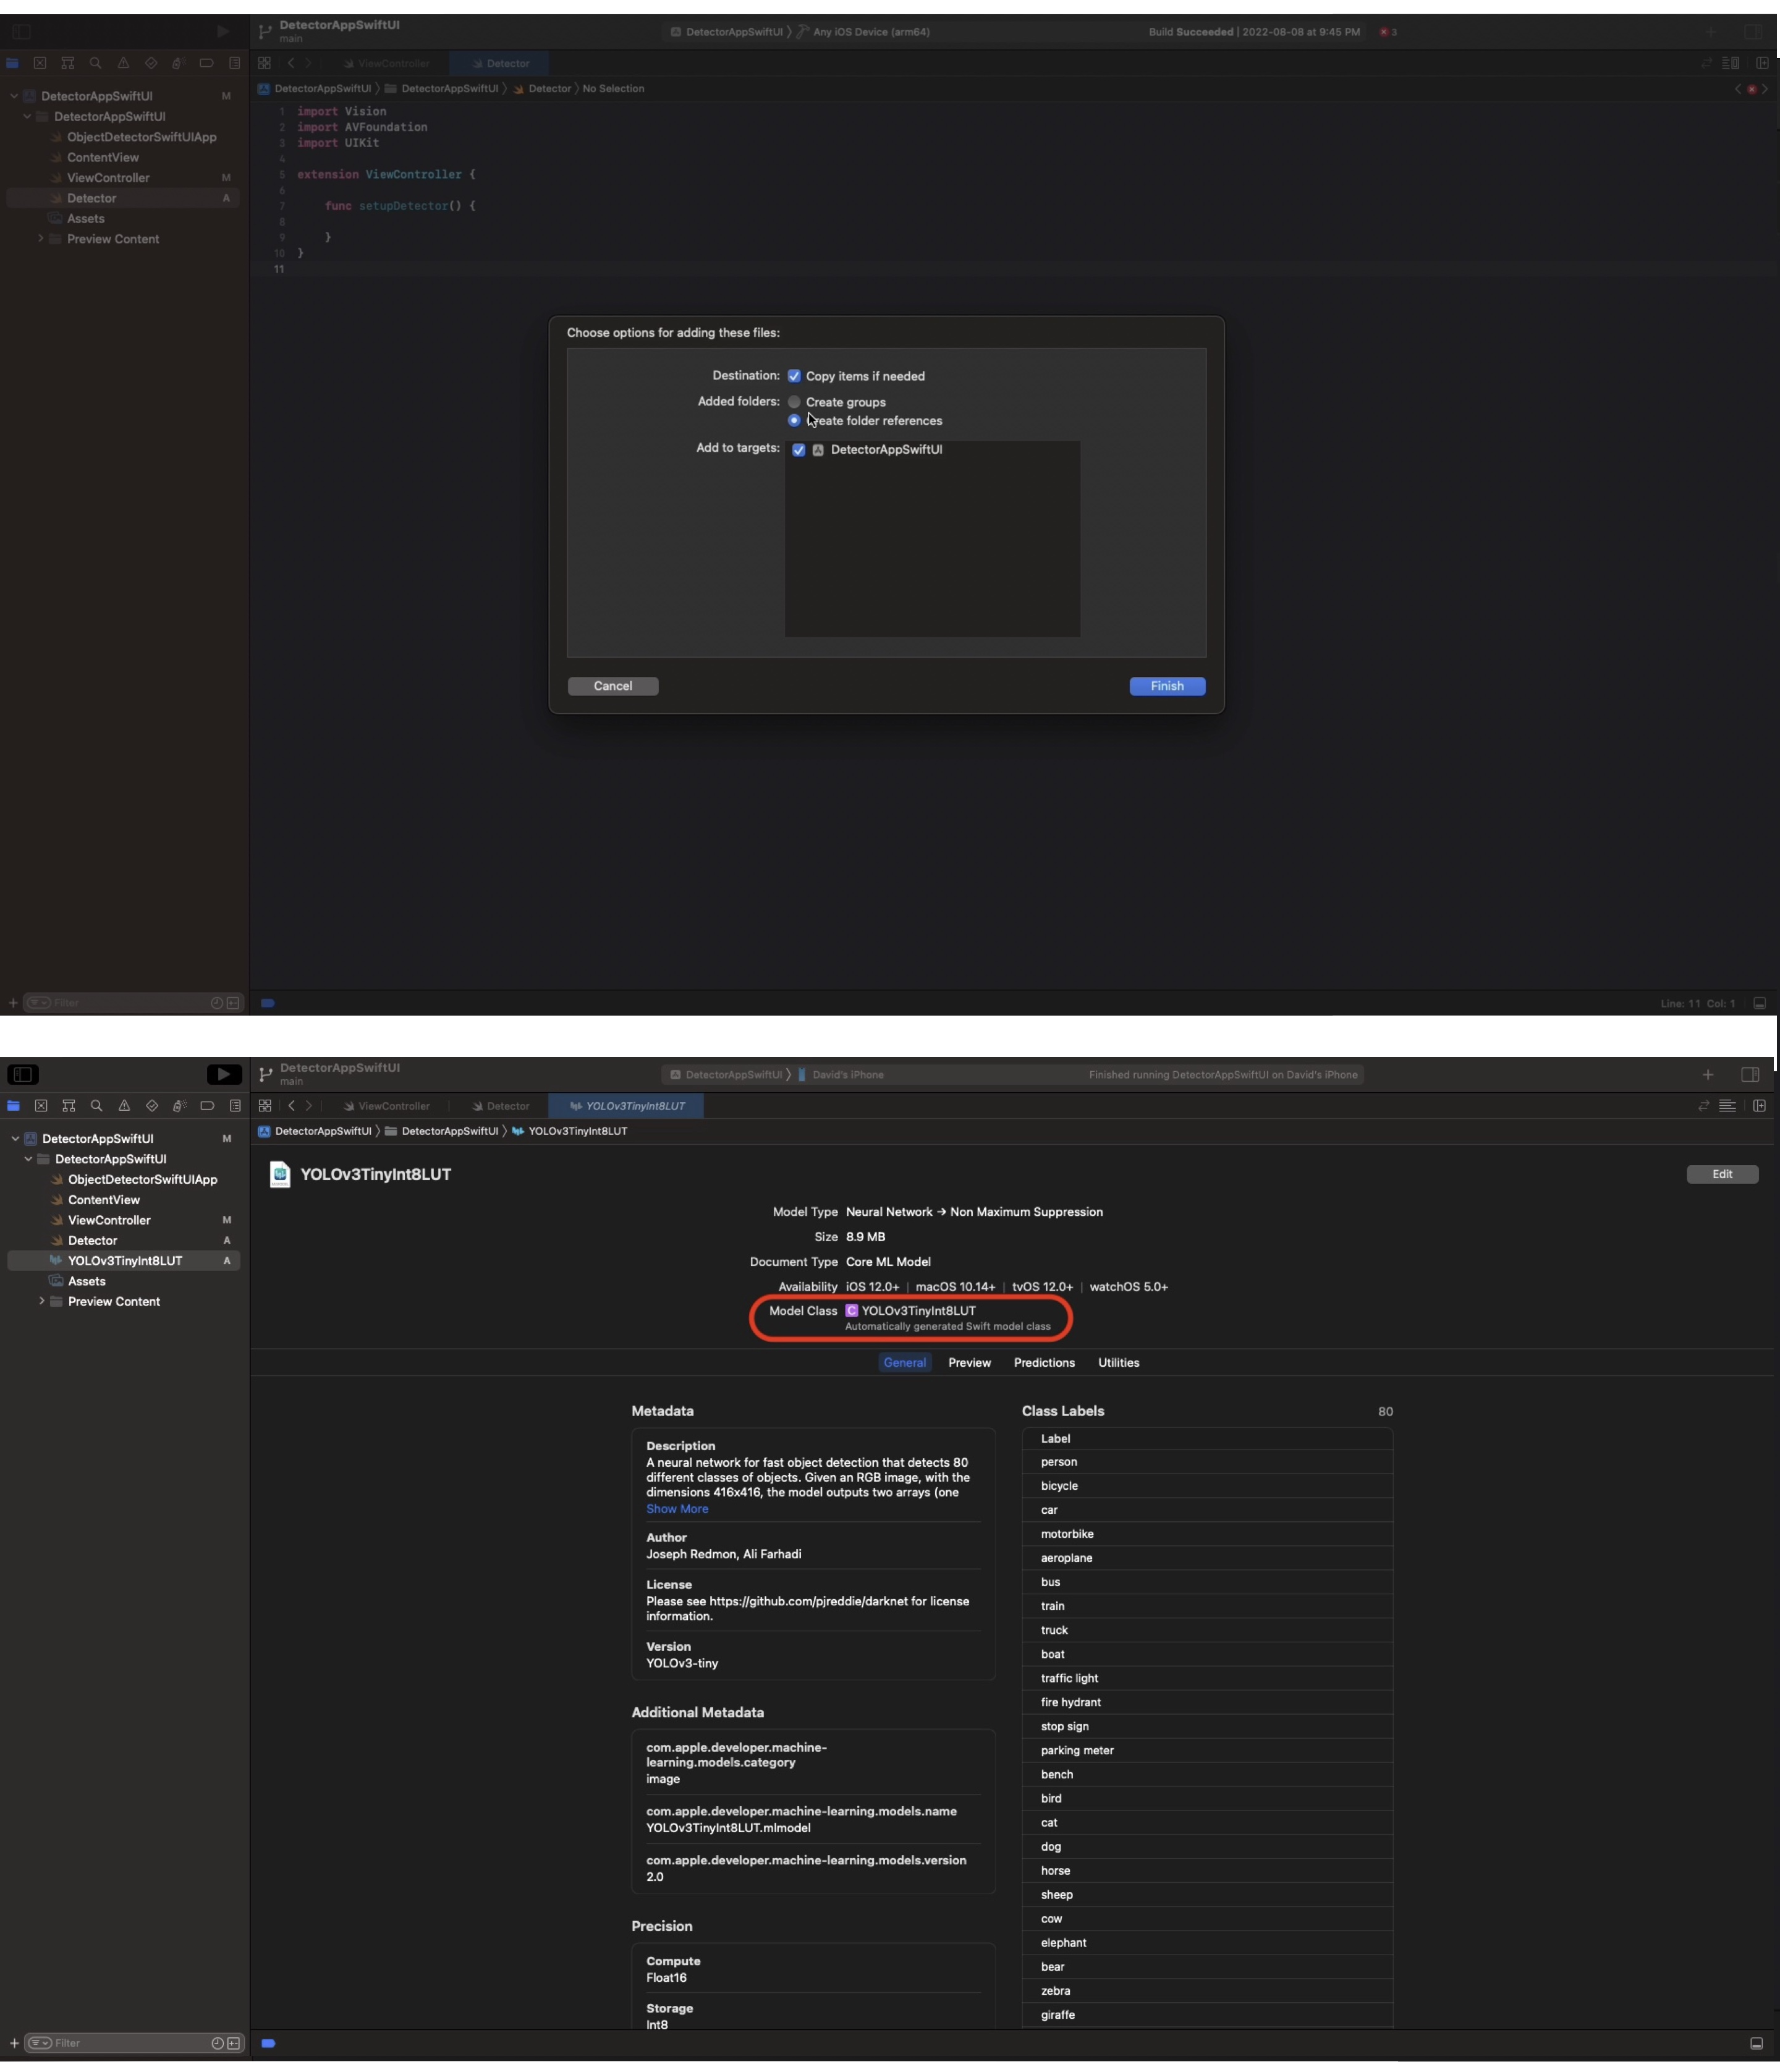
Before we implement extractDetections we set up the layers in which we want to draw the bounding boxes. Figure 3 shows the layer hierarchy we use to draw the boxes on the screen.
The foundation is the view’s underlying layer. In the previous post, we added the previewLayer to it which presents the live camera feed. On the same level we now add the detectionLayer which will contain all of the bounding boxes. Each bounding box is itself a layer which we add to the detectionLayer.
To implement this we first add the instance variable detectionLayer in ViewController.
var detectionLayer: CALayer! = nil
When the app starts, we add this layer to the root view’s layer after setting its dimensions to the screen size in the function setupLayers.
func setupLayers() {
    detectionLayer = CALayer()
    detectionLayer.frame = CGRect(x: 0, y: 0, width: screenRect.size.width, height: screenRect.size.height)
    self.view.layer.addSublayer(detectionLayer)
}
We call setupLayers in viewDidLoad of the ViewController from post 1 after setupCaptureSession, but before setupDetector.
If the orientation of the device changes, we can call updateLayers to adjust the dimensions, similar to the preview layer in the previous post.
func updateLayers() {
    detectionLayer?.frame = CGRect(x: 0, y: 0, width: screenRect.size.width, height: screenRect.size.height)
}
We call this function in the willTransition method of the ViewController.
override func willTransition(to newCollection: UITraitCollection, with coordinator: UIViewControllerTransitionCoordinator) {
    screenRect = UIScreen.main.bounds
    // Preview layer
    // ...

    updateLayers()
}
Extracting detections
To draw the bounding boxes, we implement extractDetections. In it, we first remove all child layers of detectionLayer which are the bounding boxes from the previous frame. Then, we iterate over each detection, transform the coordinates, create the boxLayer, and add it to detectionLayer.
func extractDetections(_ results: [VNObservation]) {
    detectionLayer.sublayers = nil // Remove all previous detections

    for observation in results where observation is VNRecognizedObjectObservation {
        guard let objectObservation = observation as? VNRecognizedObjectObservation else {  continue }

        // TODO: Coordinate transformations
        // ...

        let boxLayer = self.drawBoundingBox(transformedBounds)
        detectionLayer.addSublayer(boxLayer)
    }
}
Transforming coordinates
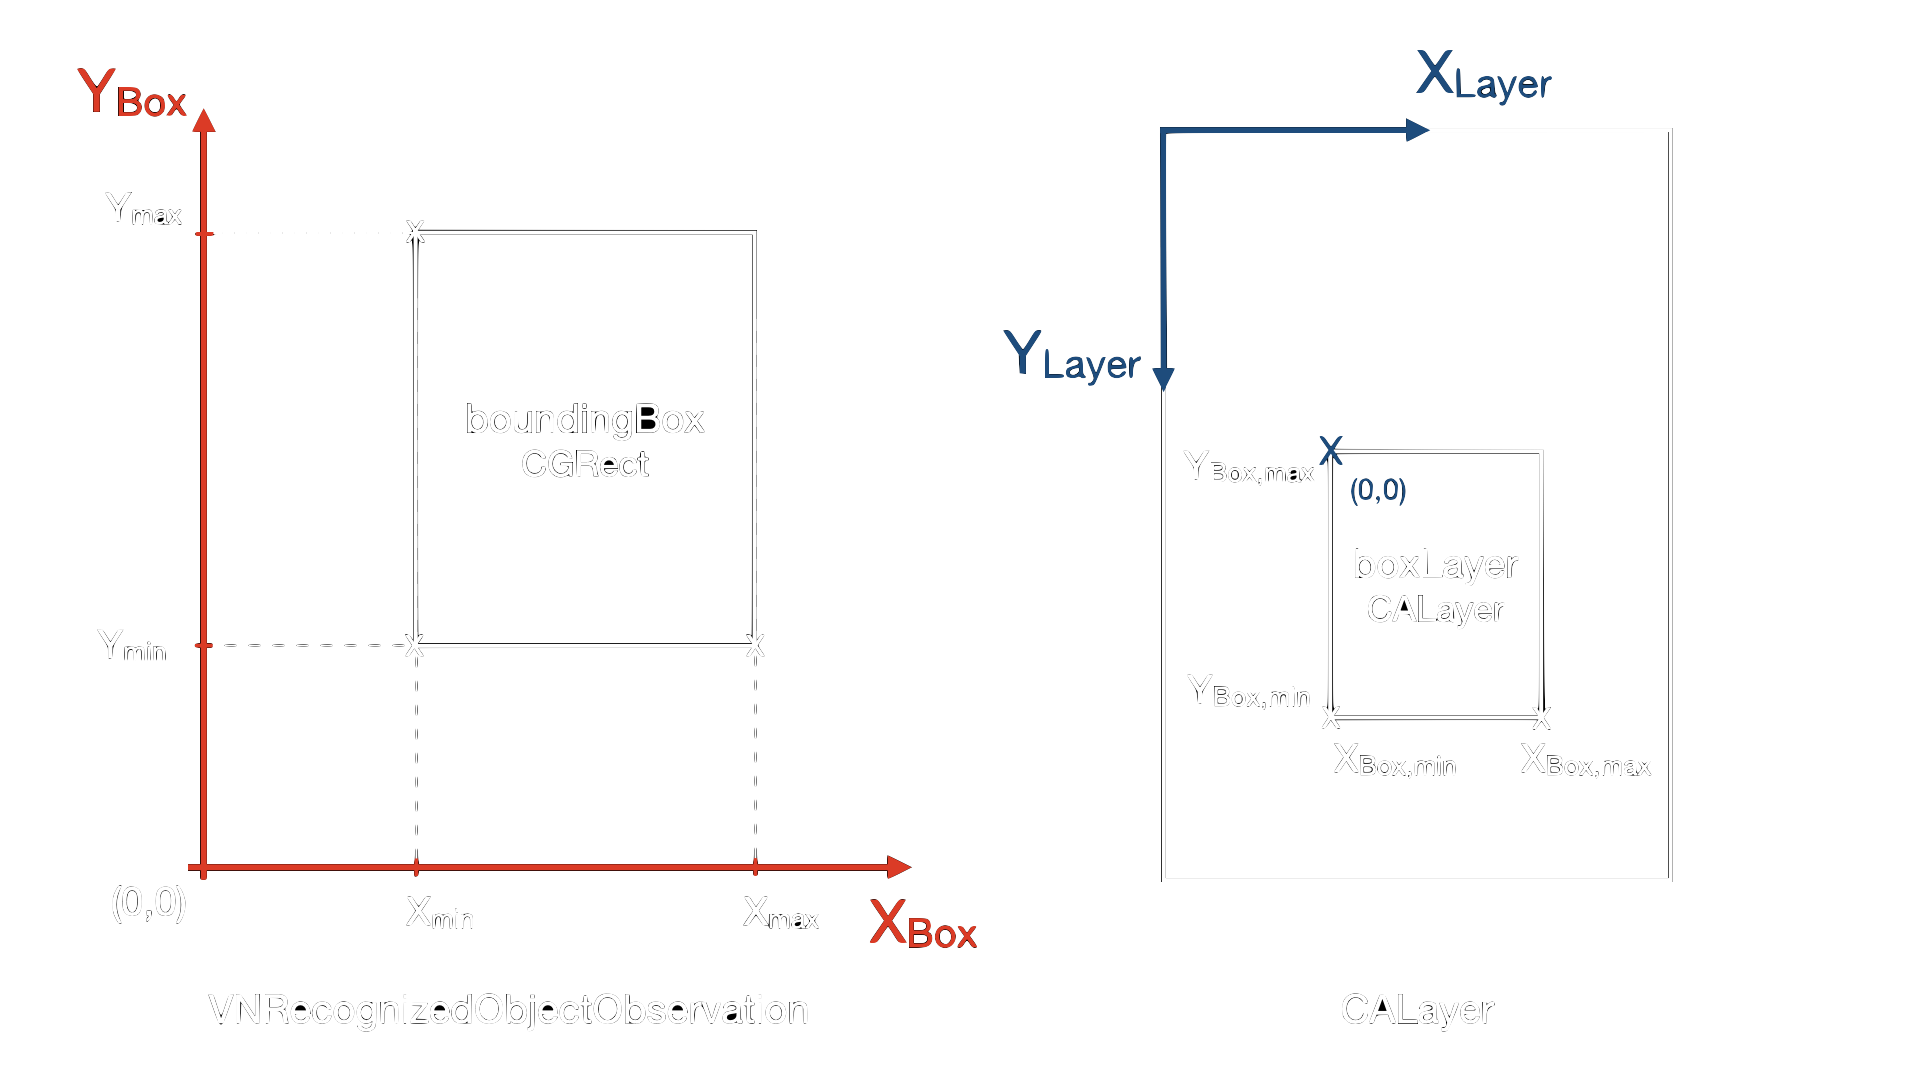
The bounding box in objectObservation is provided as VNRecognizedObjectObservation and has the four values (x, y, height, width) in a CGRect structure. The values are scaled into the range of \([0,1]\). The box is expressed in a reference system which sits in the bottom left corner, see figure 4 left. There are multiple coordinates available to position the box. In the figure, you can see \(x_{min}\) and \(x_{max}\) for example.
We can scale the bounding box to the dimensions of our layer.
let objectBounds = VNImageRectForNormalizedRect(objectObservation.boundingBox, Int(screenRect.size.width), Int(screenRect.size.height))
To draw the box, we use a Core Animation layer. Consequently, we must create a layer with the height and width of the bounding box and position it relatively to the root view’s layer. A CALayer has the origin in the top left corner and extends to the bottom right, see right of figure 4.
So we must transform from box coordinates into layer coordinates. For the position of the top left corner of the box this is
\begin{equation} x_{Layer} = x_{Box, min} \end{equation}
\begin{equation} y_{Layer} = H_{Screen} - y_{Box, max} \end{equation}
where \(H_{Screen}\) is the height of the screen which we have in screenRect. For the width and height we use
\begin{equation} w_{Layer} = x_{max} - x_{min} \end{equation}
\begin{equation} h_{Layer} = y_{max} - y_{min} \end{equation}
We implement these transformations in a CGRect we call transformedBounds which we can then use to create a boxLayer.
let transformedBounds = CGRect(x: objectBounds.minX, y: screenRect.size.height - objectBounds.maxY, width: objectBounds.maxX - objectBounds.minX, height: objectBounds.maxY - objectBounds.minY)
Drawing box
The function drawBoundingBox takes the transformed CGRect and returns the layer. We position and size it in the reference system of its parent, the detectionLayer with .frame.
func drawBoundingBox(_ bounds: CGRect) -> CALayer {
    let boxLayer = CALayer()
    boxLayer.frame = bounds
    boxLayer.borderWidth = 3.0
    boxLayer.borderColor = CGColor.init(red: 7.0, green: 8.0, blue: 7.0, alpha: 1.0)
    boxLayer.cornerRadius = 4
    return boxLayer
}
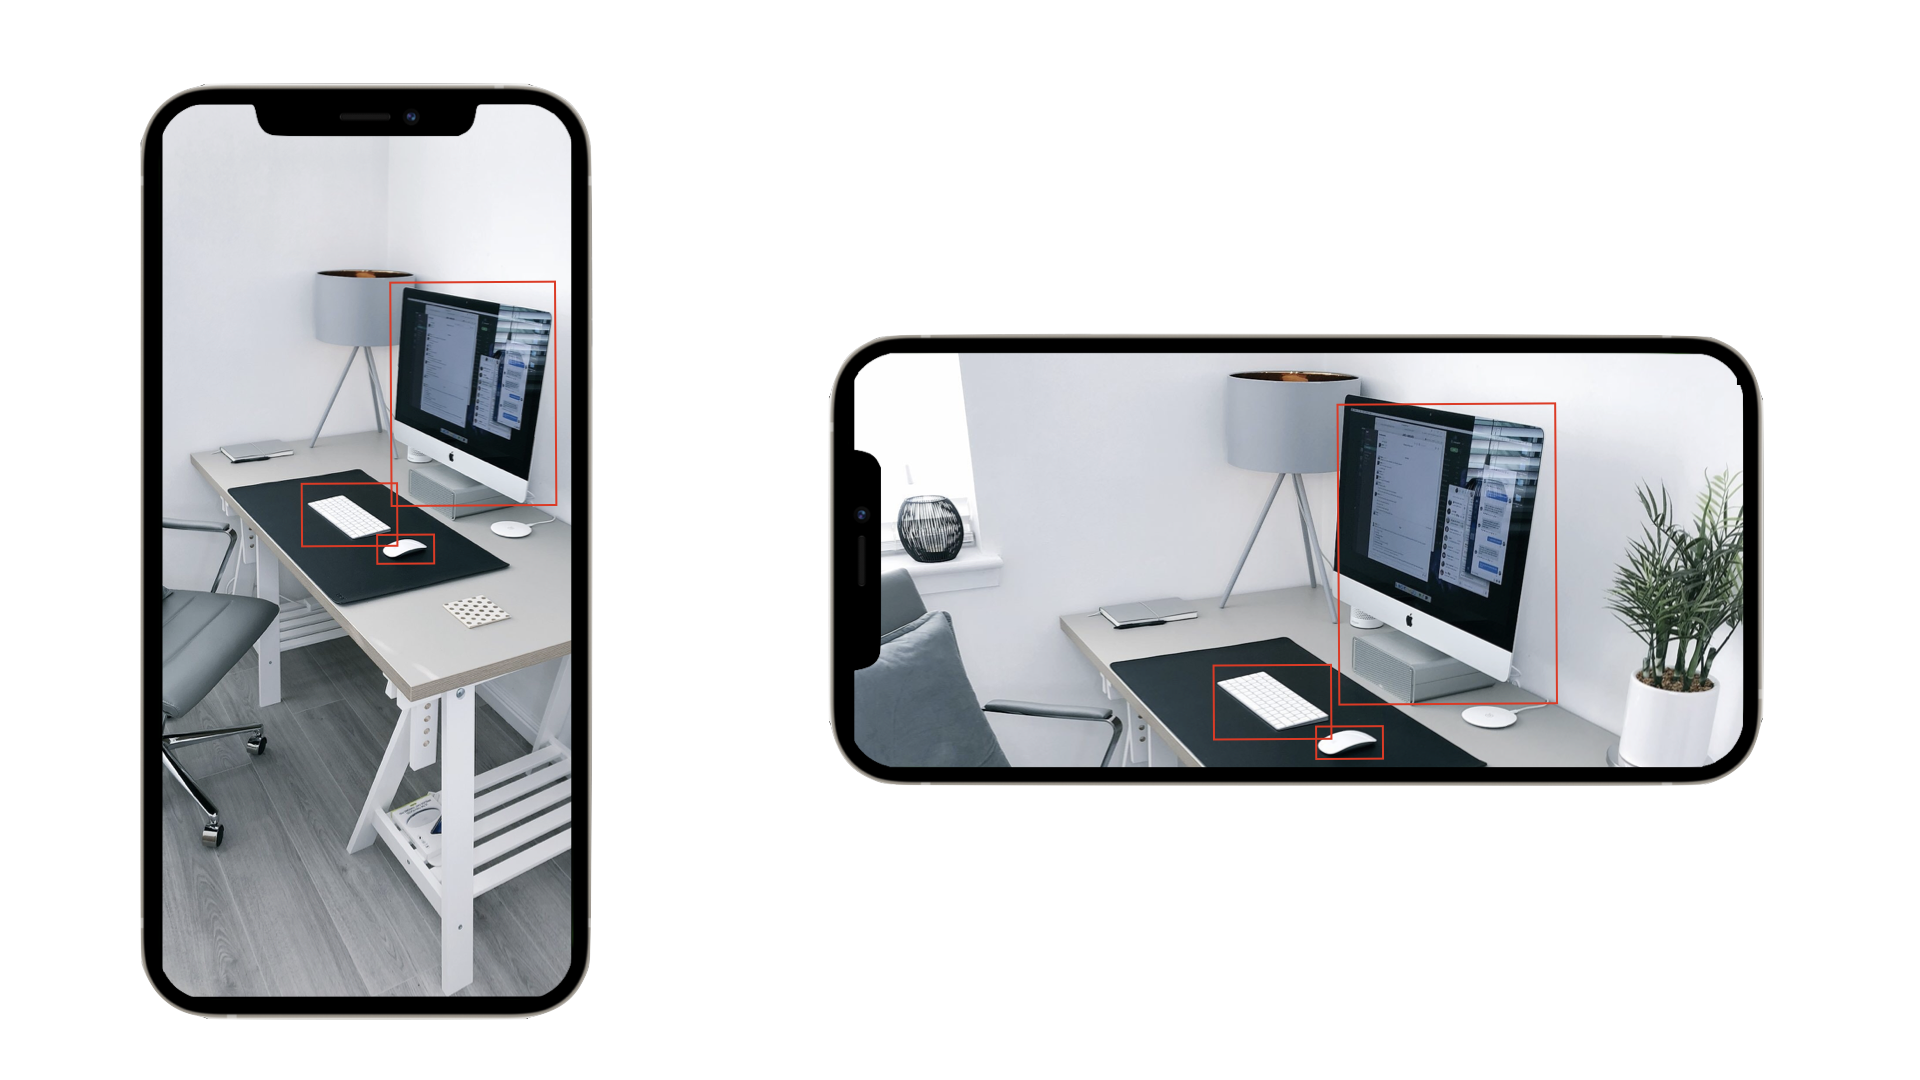
Figure 5 shows the result.
Conclusion
We have taken our app with the live camera preview from the previous post and added an object detection model by adding a pixel buffer output to the capture session. Since the live camera feed is handled by the preview layer and the detection on a separate pixel buffer, we can scale the images down before sending them to the model and also skip frames if the detection runs too slowly. Because of this separation, our camera feed will remain smooth and in high resolution.