
Live camera feed in SwiftUI with AVCaptureVideoPreview layer
In this post, we are going to build a SwiftUI-based app which shows the live camera feed on the screen with rotation support. The app is built with future image processing in mind, so that for example an object detection model can easily be added. Note that this is different from my DriverAssistant app, which uses SwiftUI embedded in a Storyboard-based interface.
This app uses UIKit and the AVFoundation framework for handling the camera.
You can get the code for this post here.
If you want to learn more about views, controllers, and layers, and how to work with them you can check out this post or the video.
And here is a video version of the post.
Adding UIKit - Hosting ViewController
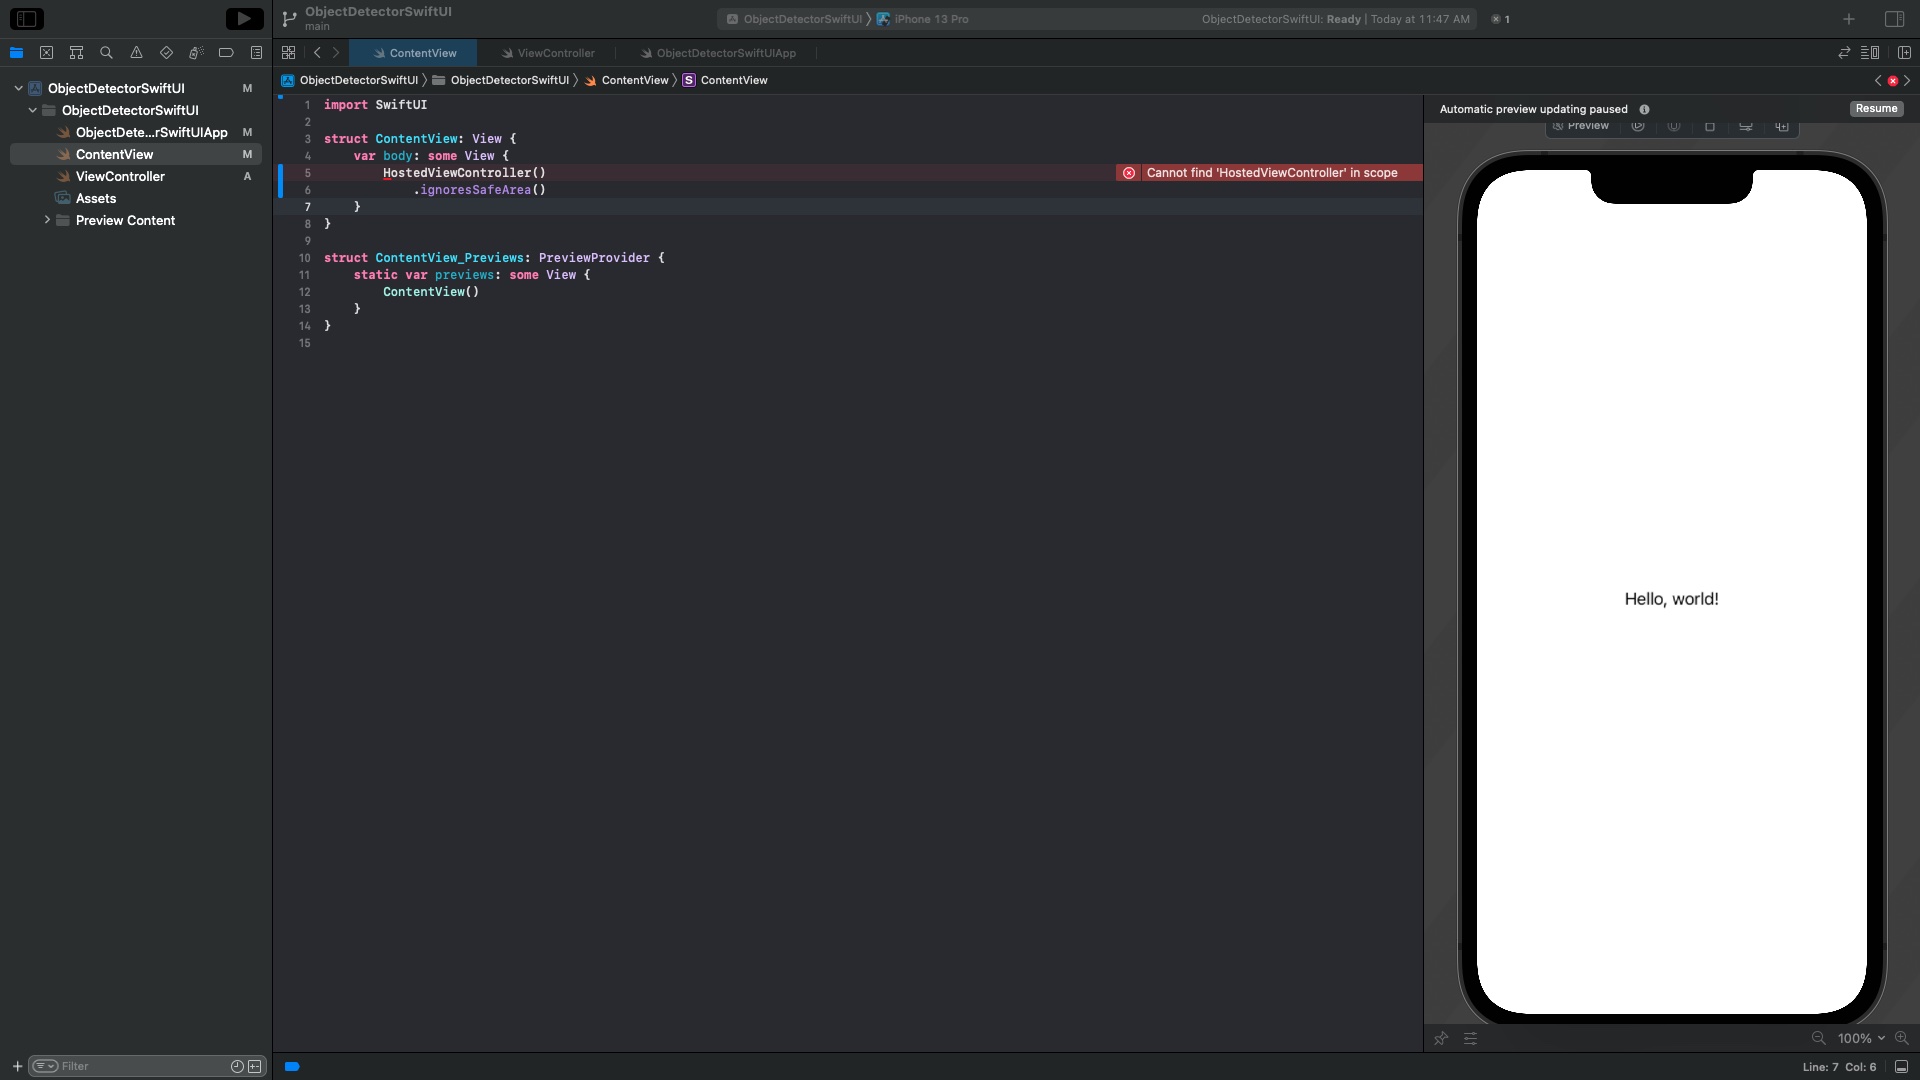
The first thing we do is to create a new SwiftUI app in Xcode and add a file called ViewController.swift to it, see figure 1. In ContentView we replace the HelloWorld text with
HostedViewController()
   .ignoresSafeArea()
This throws an error since we have not defined HostedViewController yet.
To fix this, we go into the ViewController.swift file and add the three imports UIKit, SwiftUI, and AVFoundation. We need the AVFoundation framework to access the camera.
We create the UIViewController class ViewController which is going to contain all of the logic to present the camera feed on the screen.
import UIKit
import SwiftUI
import AVFoundation

class ViewController: UIViewController {

}
To add this controller to SwiftUI we create a UIViewControllerRepresentable which wraps it in a SwiftUI view. Let’s add the following code below the ViewController class.
struct HostedViewController: UIViewControllerRepresentable {
    func makeUIViewController(context: Context) -> UIViewController {
        return ViewController()
        }

        func updateUIViewController(_ uiViewController: UIViewController, context: Context) {
        }
}
When we now go back to the ContentView we see that the error has disappeared. The controller’s underlying view is shown on the screen as a SwiftUI view.
Setting up ViewController
The controller has two tasks here. It checks if the app has permission to access the camera, and if so sets up the capture session to present the feed.
The first thing we do in the controller is to define some variables.
private var permissionGranted = false // Flag for permission

private let captureSession = AVCaptureSession()
private let sessionQueue = DispatchQueue(label: "sessionQueue")

private var previewLayer = AVCaptureVideoPreviewLayer()
var screenRect: CGRect! = nil // For view dimensions
The first one lets us handle the control flow depending on whether the user has granted access to the camera or not.
The next two are required for accessing the camera, while the last two deal with presenting the camera feed. We will go over all of them in detail later.
We override the viewDidLoad method to check for permission and start the capture session once the app is opened.
import UIKit
import SwiftUI
import AVFoundation

class ViewController: UIViewController {
    private var permissionGranted = false // Flag for permission
    private let captureSession = AVCaptureSession()
    private let sessionQueue = DispatchQueue(label: "sessionQueue")
    private var previewLayer = AVCaptureVideoPreviewLayer()
    var screenRect: CGRect! = nil // For view dimensions

  override func viewDidLoad() {
        checkPermission()

        sessionQueue.async { [unowned self] in
            guard permissionGranted else { return }
            self.setupCaptureSession()
            self.captureSession.startRunning()
        }
    }
}
The functions we call here are implemented and explained in detail below. CheckPermission() is a function in which we check if the user has granted permission to use the camera. Then we use the sessionQueue to set up our capture session if the app has permission to access the camera.
Requesting camera access permission
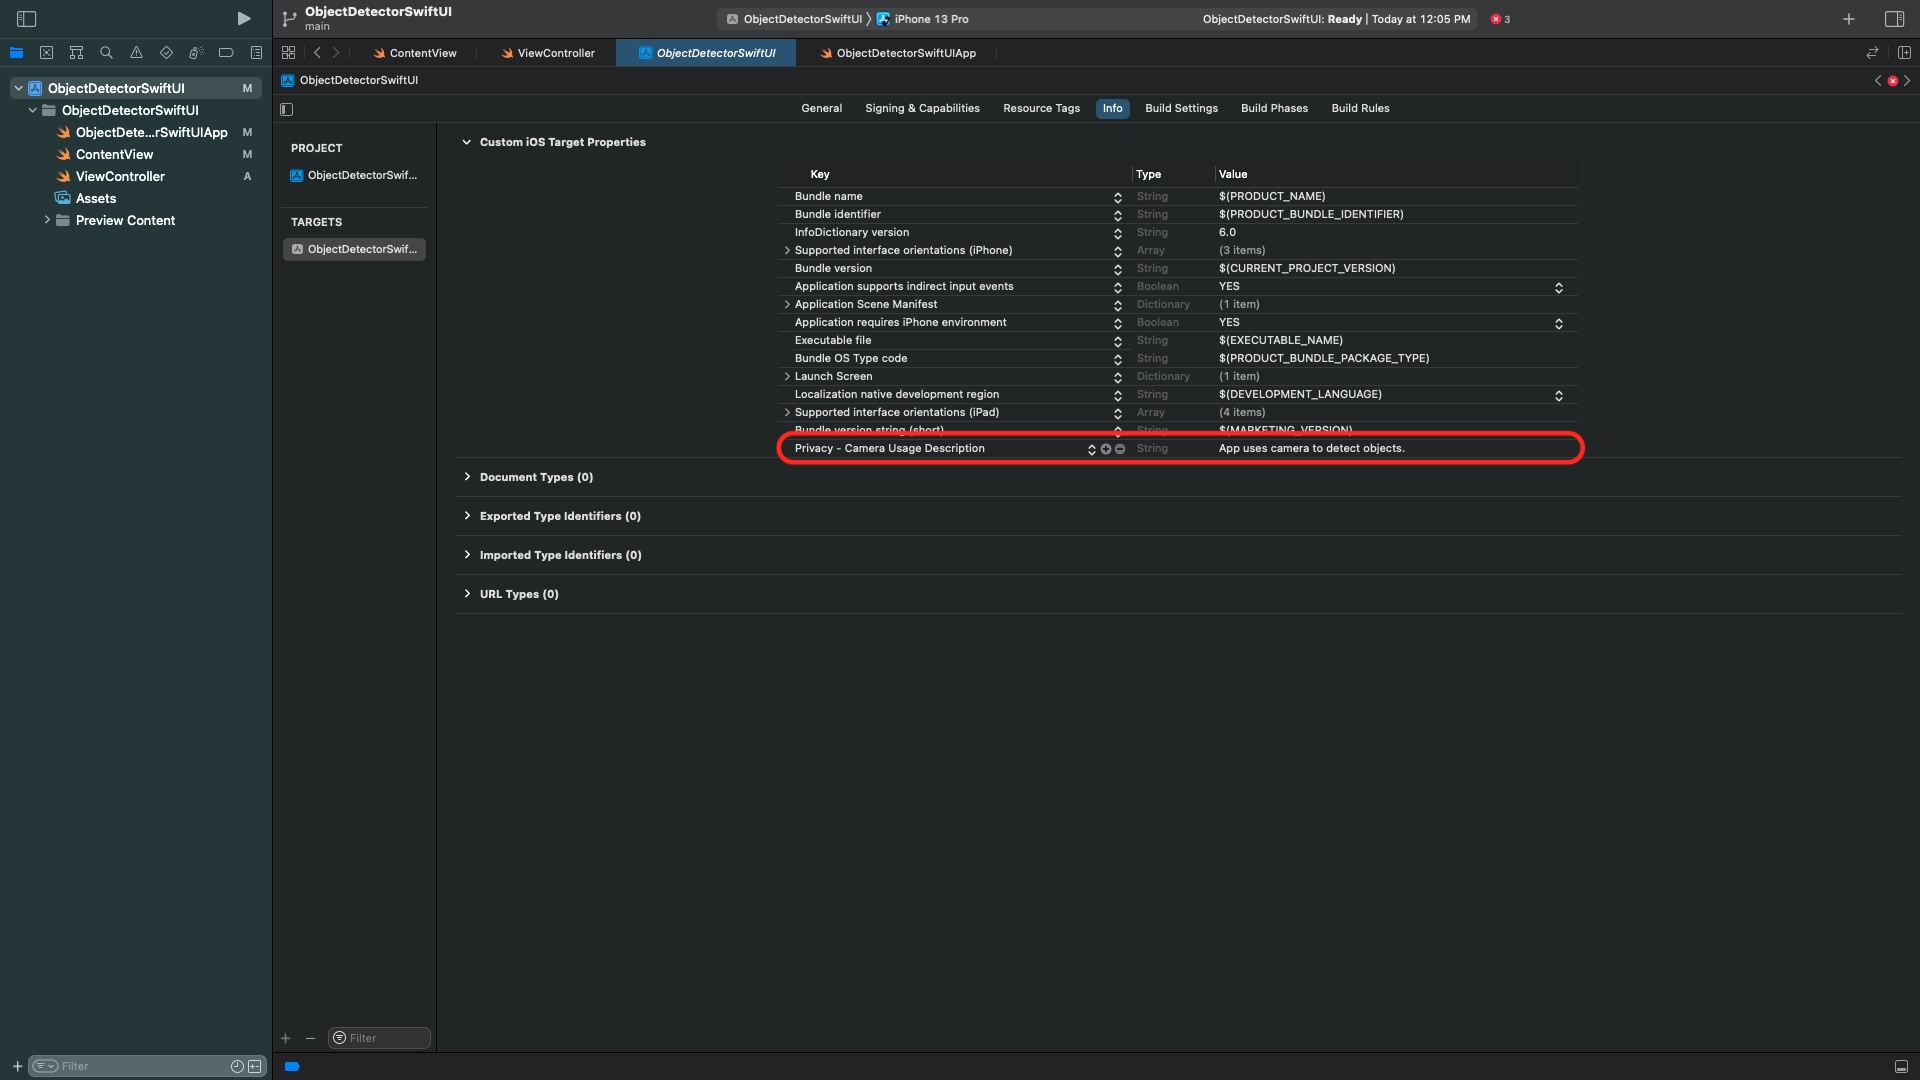
Before our app can access the camera for the first time, the user has to grant permission to do so. To add this check we add a privacy user description, see figure 2. To get there, select the project, then go to Info and add a new entry by hovering over an existing entry and clicking on the plus symbol.
The user’s decision is persisted on the device. Whenever the app starts, we read this decision with AVCaptureDevice.authorizationStatus(for: .video) and set our flag permissionGranted accordingly.
func checkPermission() {
    switch AVCaptureDevice.authorizationStatus(for: .video) {
        // Permission has been granted before
        case .authorized:
            permissionGranted = true

        // Permission has not been requested yet
        case .notDetermined:
            requestPermission()

        default:
            permissionGranted = false
    }
}
In case the user has not been asked to grant access we request permission.
func requestPermission() {
    sessionQueue.suspend()
    AVCaptureDevice.requestAccess(for: .video) { [unowned self] granted in
        self.permissionGranted = granted
        self.sessionQueue.resume()
    }
}
When we go back to the controller, we see that the capture session setup is performed on the DispatchQueue sessionQueue. The first thing we do in it is to check the value of our flag. Since requesting permission is asynchronous, we suspend the session queue here before making the request. This ensures that the capture session is configured only once a decision has been made.
Setting up capture session
Now that we have the permission handled, let’s implement the function setupCaptureSession().
A capture session lets us access devices such as the camera and provide captured data for other objects, such as the preview layer in our case. Figure 3 shows the components of the capture session which we will need here.
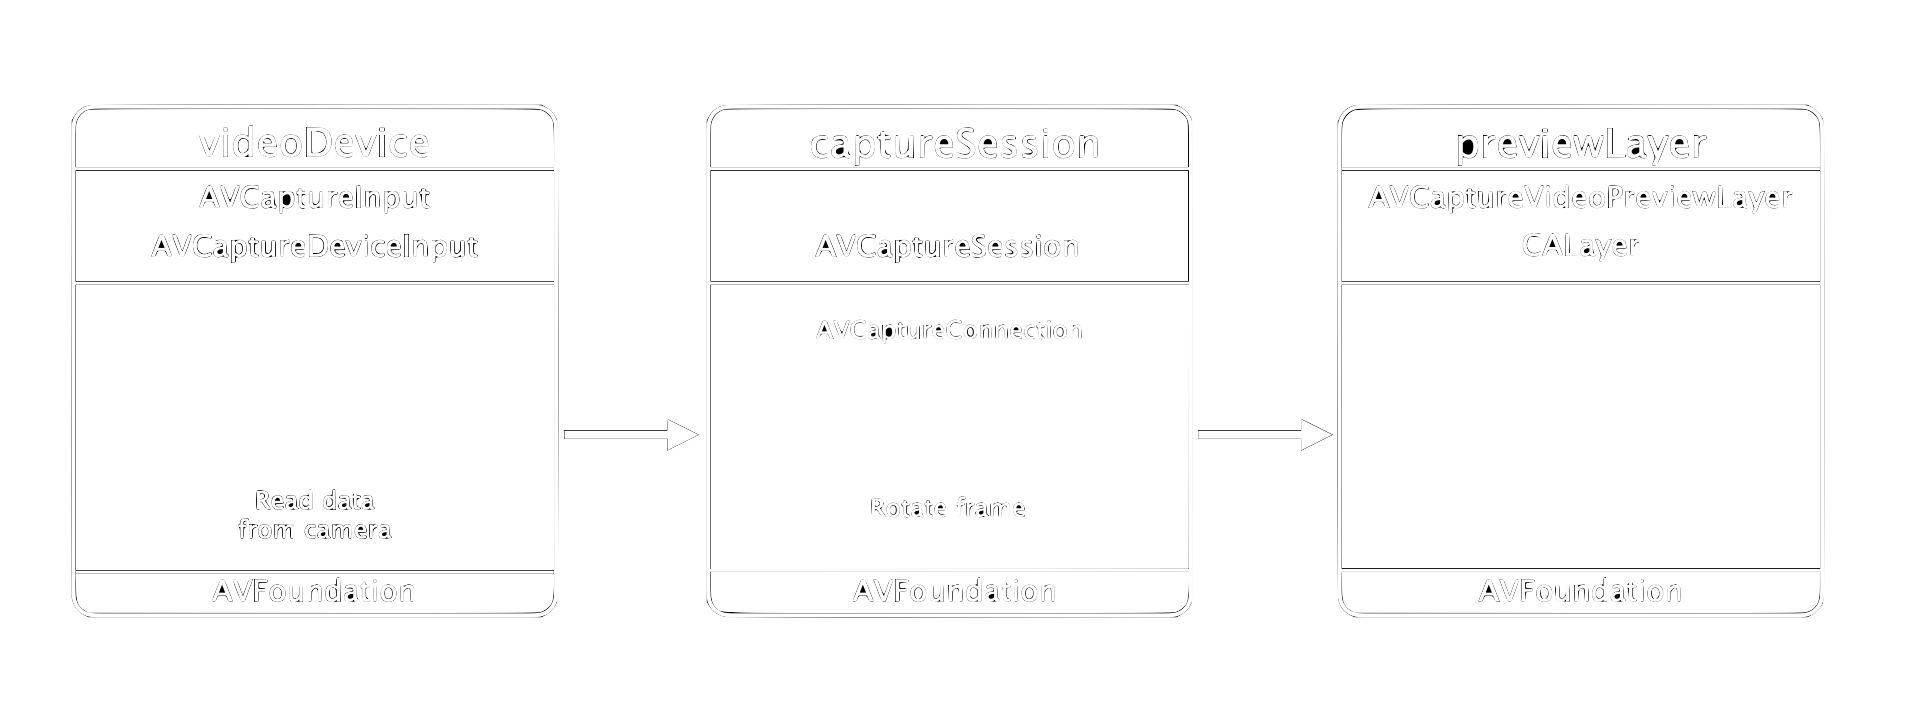
We need one input, the camera, and one output, the previewLayer. In the capture session, we can rotate the incoming frames into the correct orientation.
In the code, we first add the camera. You might have to select a different camera in line 3, depending on your device.
func setupCaptureSession() {
    // Access camera
    guard let videoDevice = AVCaptureDevice.default(.builtInDualWideCamera,for: .video, position: .back) else { return }
    guard let videoDeviceInput = try? AVCaptureDeviceInput(device: videoDevice) else { return }

    guard captureSession.canAddInput(videoDeviceInput) else { return }
    captureSession.addInput(videoDeviceInput)

    // TODO: Add preview layer
}
Adding live preview
Let’s implement the previewLayer as the output (right side in figure 3). AVFoundation gives us the AVCaptureVideoPreviewLayer class to present a camera feed. This is a CALayer which we can add to our view/layer hierarchy. To learn more about layers and how to position them check out this post.
To add the layer, we have to set its size and position. Since the dimension depends on the device’s orientation we save the current width and height in the screenRect variable, and use it to set the .frame property of the layer. Additionally, we set the orientation of the incoming frames to portrait.
screenRect = UIScreen.main.bounds

previewLayer = AVCaptureVideoPreviewLayer(session: captureSession)
previewLayer.frame = CGRect(x: 0, y: 0, width: screenRect.size.width, height: screenRect.size.height)
previewLayer.videoGravity = AVLayerVideoGravity.resizeAspectFill // Fill screen

previewLayer.connection?.videoOrientation = .portrait
All of this setup is handled on our sessionQueue. Since updates to the UI must be performed on the main queue we add our preview layer to the root view’s layer on the main queue.
 // Updates to UI must be on main queue
DispatchQueue.main.async { [weak self] in
    self!.view.layer.addSublayer(self!.previewLayer)
}
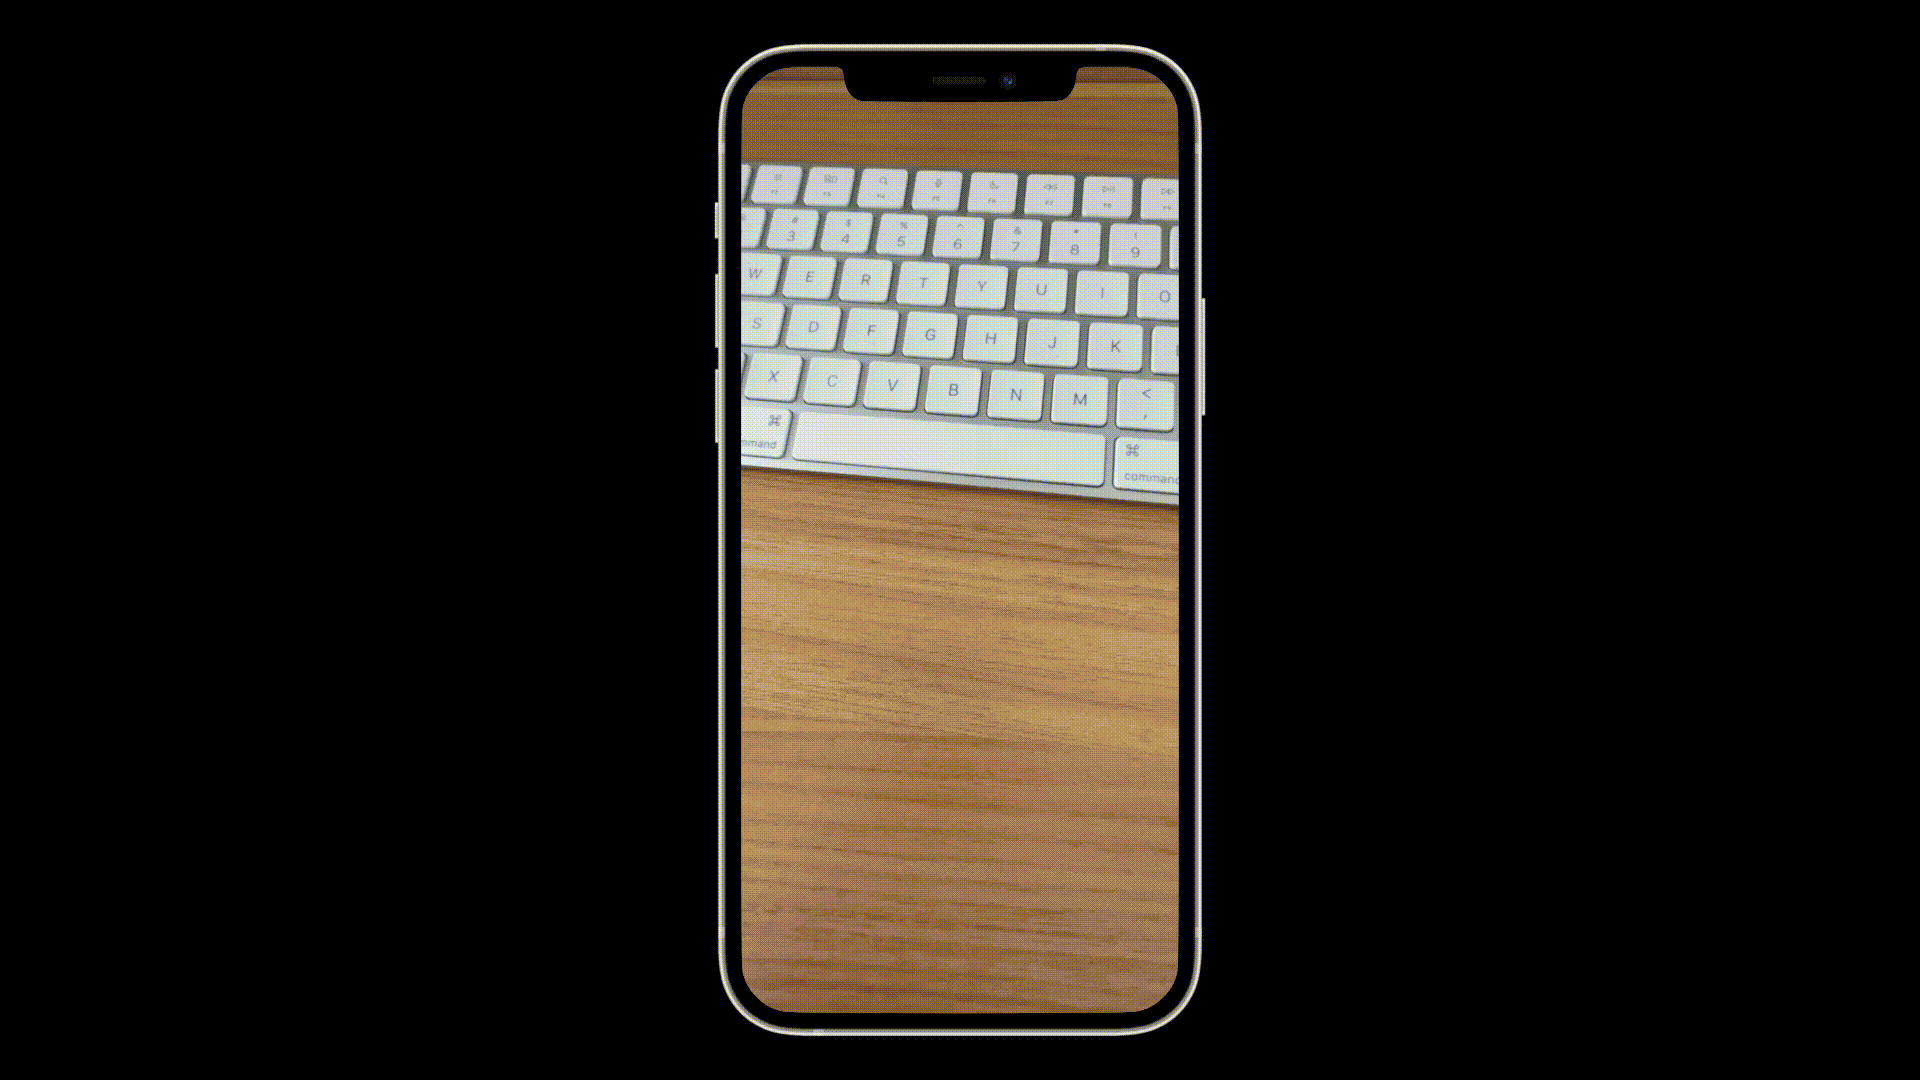
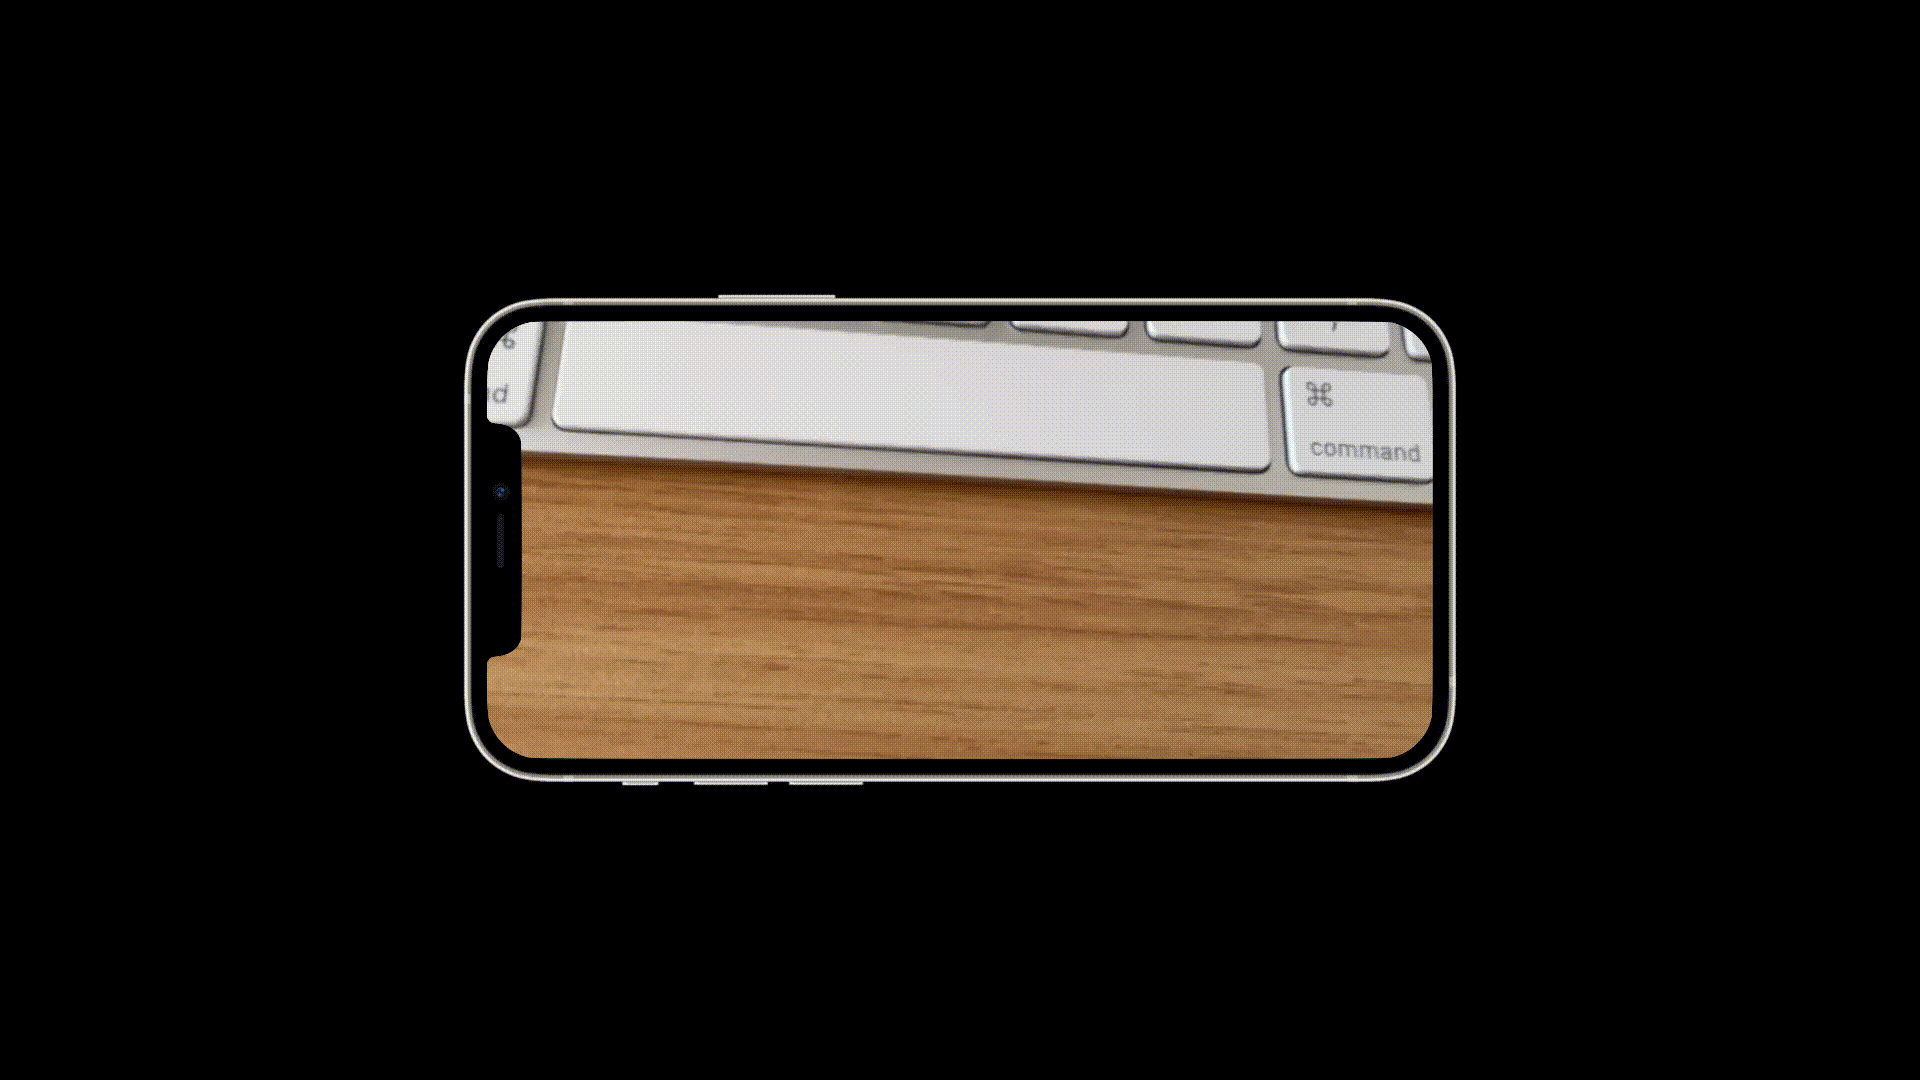
When we now run this app we can see a full screen camera feed, see figure 4.
Adding device rotation
The app works great as long as we open it in portrait orientation and leave it there. As soon as we rotate the device, SwiftUI will rotate the view. Then the dimensions of the preview layer don’t match the screen anymore and so we have a large unused section on the screen. Additionally, the camera feed now appears rotated, see figure 5.
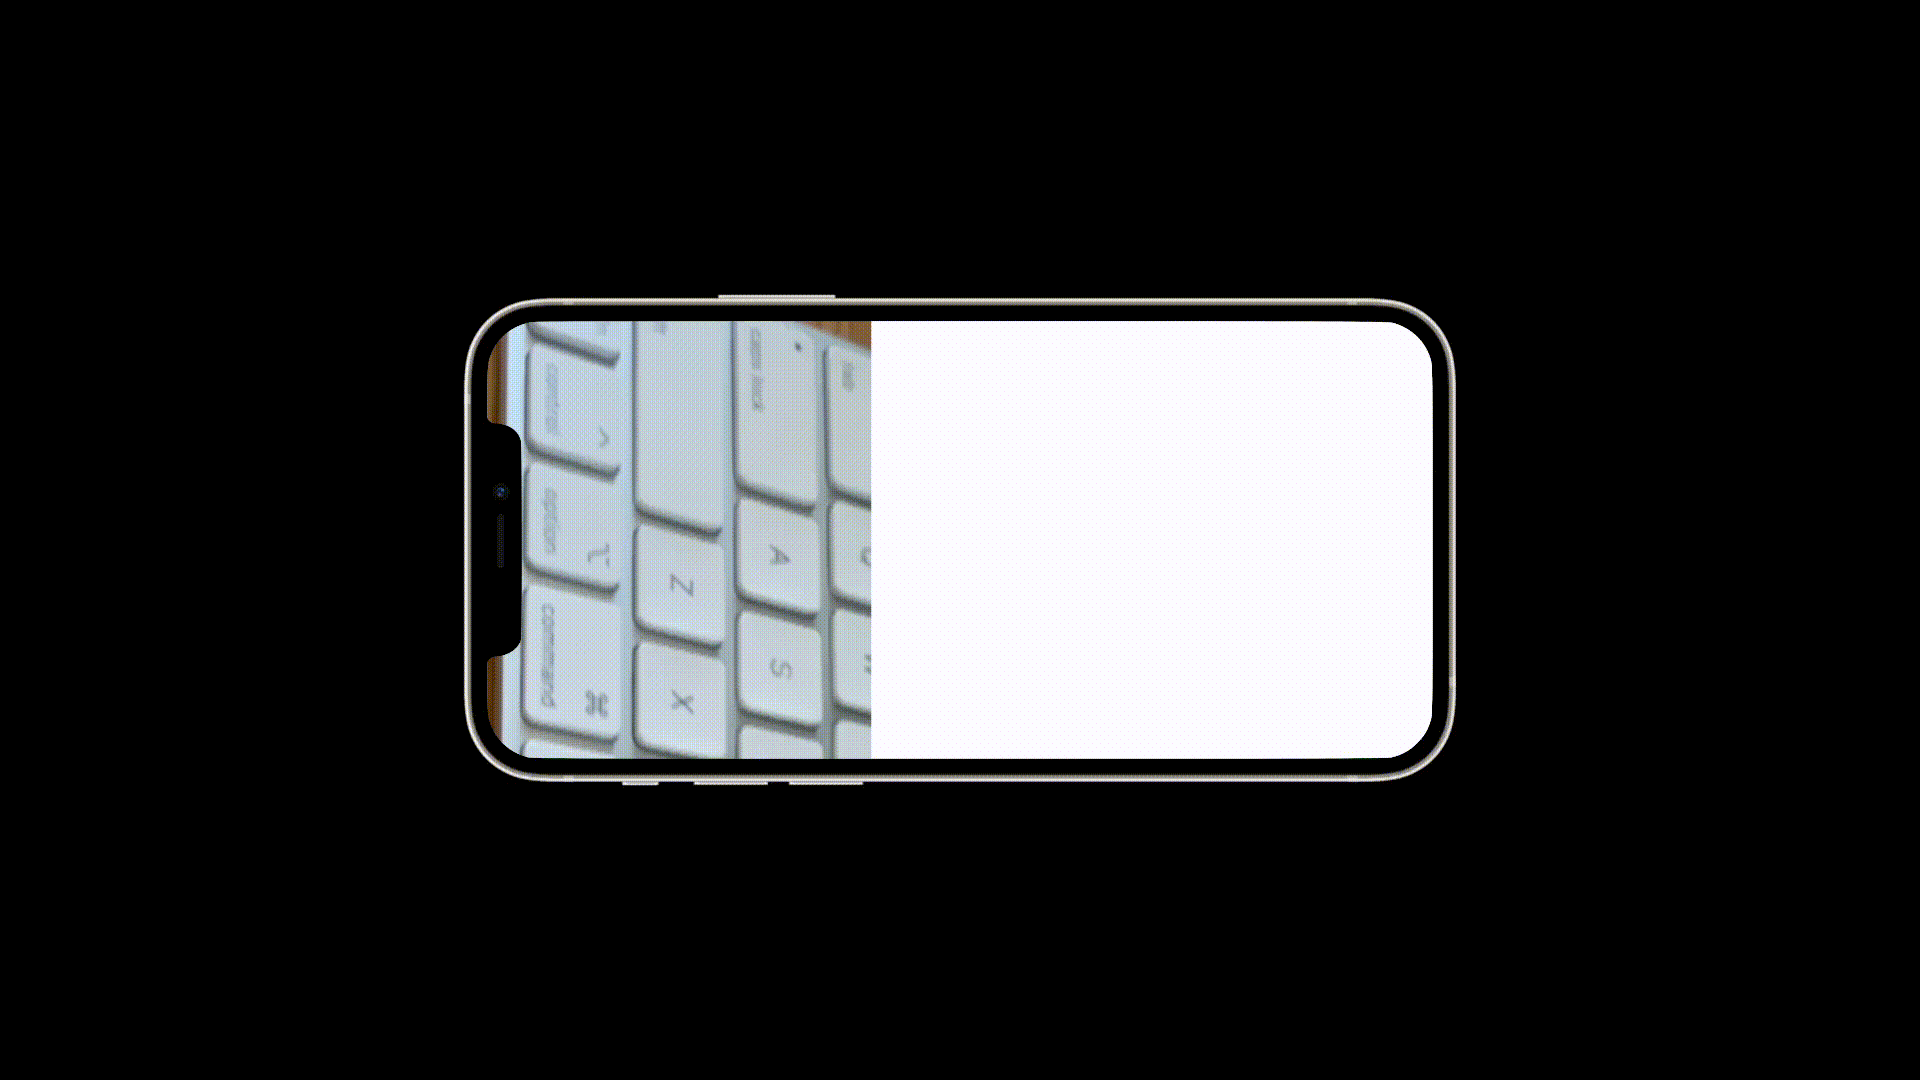
We can fix this by reading the device’s orientation when it has changed and update the layer’s dimensions as well as the orientation of the incoming frames.
To detect that the orientation has changed we override the controller’s willTransition method.
override func willTransition(to newCollection: UITraitCollection, with coordinator: UIViewControllerTransitionCoordinator) {

}
When this method is triggered, we update our variable screenRect with the current screen dimensions. Then, we read the device’s orientation and update the rotation of the incoming frames in the capture connection.
screenRect = UIScreen.main.bounds
self.previewLayer.frame = CGRect(x: 0, y: 0, width: screenRect.size.width, height: screenRect.size.height)

switch UIDevice.current.orientation {
    // Home button on top
    case UIDeviceOrientation.portraitUpsideDown:
        self.previewLayer.connection?.videoOrientation = .portraitUpsideDown

    // Home button on right
    case UIDeviceOrientation.landscapeLeft:
        self.previewLayer.connection?.videoOrientation = .landscapeRight

    // Home button on left
    case UIDeviceOrientation.landscapeRight:
        self.previewLayer.connection?.videoOrientation = .landscapeLeft

    // Home button at bottom
    case UIDeviceOrientation.portrait:
        self.previewLayer.connection?.videoOrientation = .portrait

    default:
        break
}
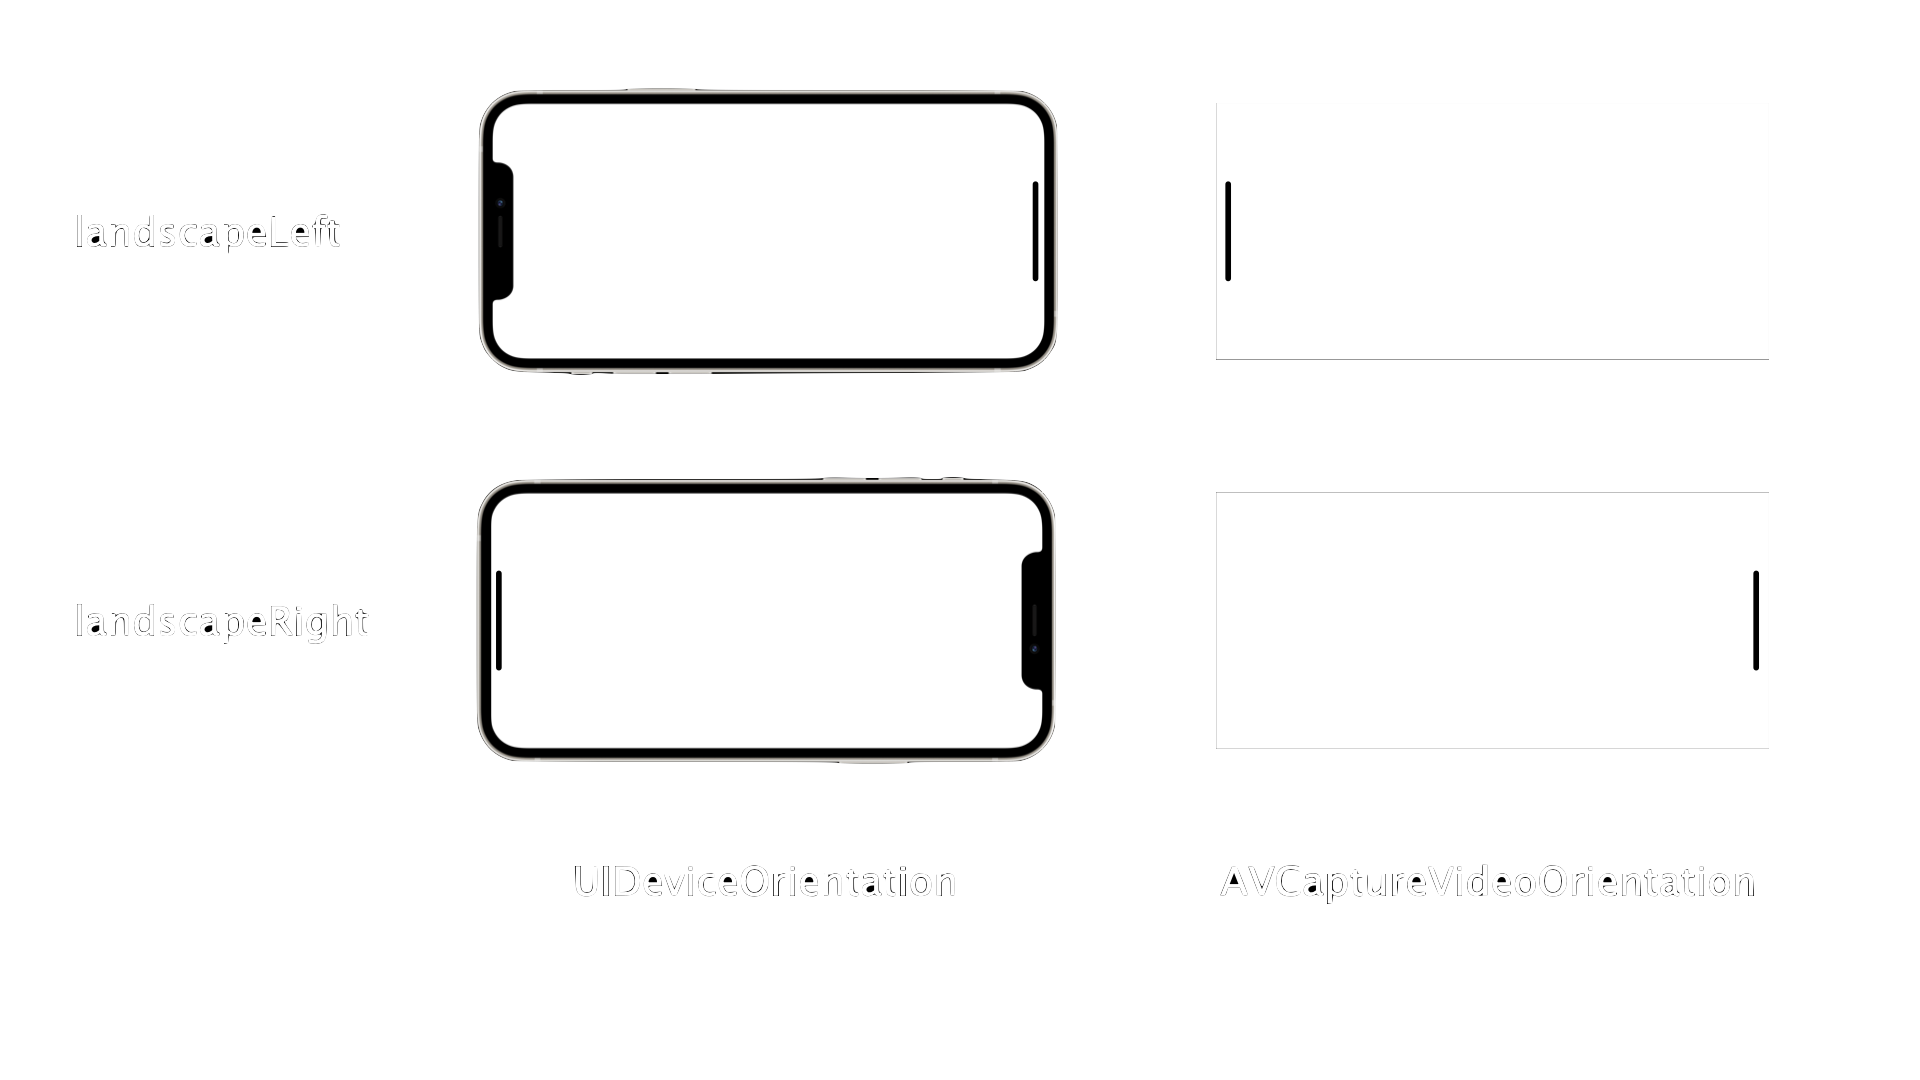
Note that there is a difference between the orientation of the device and the layer in landscape modes. That is because the device checks if the home button is on the left or right, while the layer checks its top edge. So when the device is in landscapeLeft, the layer is in landscapeRight, see figure 6.
When we run our app again and rotate the device we see that the preview feed now works correctly in all orientations, see figure 7.
Why not use SwiftIU only?
While it is possible to build what we just did without UIKit (see my video) it is not practical to add both a preview and a detection model in parallel.
Detecting objects is computationally expensive and depending on the size of the model, can take much longer than presenting frames as done in the preview. That is why we want to have the preview done on one thread and the detection in parallel on a separate one. That way we can skip frames for the detection if necessary while maintaining a smooth camera feed.
The reasons we must use UIKit here are this. When we use SwiftUI only we use a pixel buffer as output from the capture session to retrieve our frames instead of the preview layer. We could read them for both the preview and for detection, but then the slower detection task will cause the preview to appear laggy. Speeding up the detection by droping frames in the buffer would cause the same result. One solution could be to have two buffers, one from which we read all frames for the preview and a second one from which we drop frames if the detection is too slow to keep up with the frame rate of the preview. Unfortunately it is not possible to use two pixel buffers with the same capture session. Likewise, it is not possible to connect the same camera to two capture sessions.
So our only feasible option is to use the preview layer for the feed and the buffer for providing frames for the detector. Since the AVCaptureVideoPreviewLayer is a Core Animation layer, we must add it via a hosted view to SwiftUI.
Conclusion
We have implemented a basic app with SwiftUI and UIKit which reads frames from the camera and presents them in a live feed on the screen. The app also supports all orientations of the device.
We have seen why we must use UIKit if we want to provide frames for a computationally expensive task such as object detections models without impacting the live feed’s performance. We will see how to add a detection model in the next post.
Comments
Can you point the way to create 2 instantiations of the camera session to capture both front and rear camera at same time?
I launched it on an iPad and rotated the iPad, but the display was not correct. I changed willTransition to viewWillTransition and it works correctly. Thank you.
Can you provide the details? I have the same problems… Thanks!
Hi I have tried to compile your code on my iPad but the result is the app show black screen on launch and nothing is happened then, do you know what is the issue?
Thanks
Try loosening the device parameters guard let videoDevice = AVCaptureDevice.default(for: .video) else { return }