
Using UIKit in SwiftUI - Views, layers, coordinates
UKit apps are typically implemented in the Model-View-Controller design pattern. This post explores what this is and how to work with its components for iOS development. In particular, we are going to review the controller and view objects and see how to work with the different coordinate systems to position objects on the screen. This is for example useful if you want to make an app with computer vision models, where model outputs are shown on the screen in a live camera feed.
The examples assume that a UIViewController is hosted so it can be used in a SwiftUI view. How this is done is explained in this excellent post.
Here is a video version of this post:
Model-View-Controller
Figure 1 shows the three components of the Model-View-Controller design pattern.
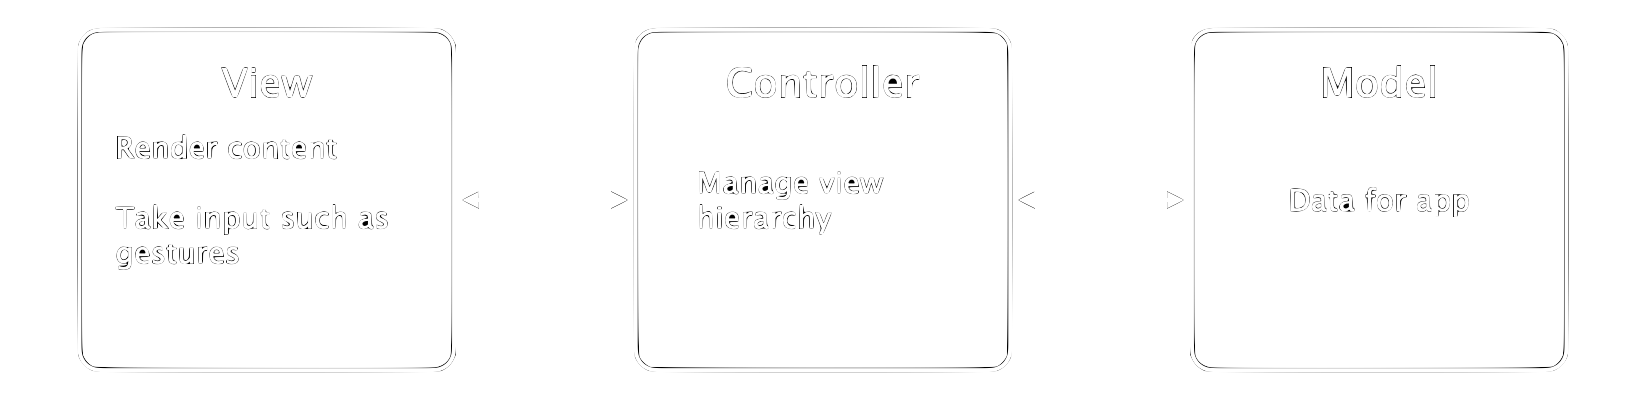
The model contains the information that makes up the app. For example, when your app shows a table with data, the data would be stored in the model. This can be dynamic, meaning that the data could be partially or fully downloaded from an external source only when it is required.
How the data appears in the table and how the table is presented to the user on screen is defined by the view object. In UIKit, a view also takes input from the screen such as touch gestures, which could be used for example to navigate to a detailed view of a table row.
With this basic table example, we now already have one model, a table view, and a detail view. Passing the data between these objects is handled by controller objects. In the example, there are two tasks for the controller. One is to navigate and lay out the two views in a hierarchy. The second one is to populate the views with the data from the model. This could be handled by one or two view controllers.
Let’s look at the view controller and view in more detail.
ViewControllers
In UIKit, controllers are implemented with the UIViewController class. Each app has at least one to handle the flow of data and to set up and update the views.
To define when something is rendered on the screen can be accomplished by using the controller’s life cycle methods. For making a simple single view app, we use the viewDidLoad method to set up the views once the app is opened.
Every UIViewController is backed by a view which can be accessed by calling self.view. For example, we can get a reference to the underlying view once the app is opened.
class MyViewController: UIViewController {

  func viewDidLoad() {
    // Access the view
    var rootView = self.view

  }
}
In the same method, once we have a reference to the view we can use it to manipulate the view. For example, we can change the view’s background colour to blue. We will see how to manipulate views next.
Views
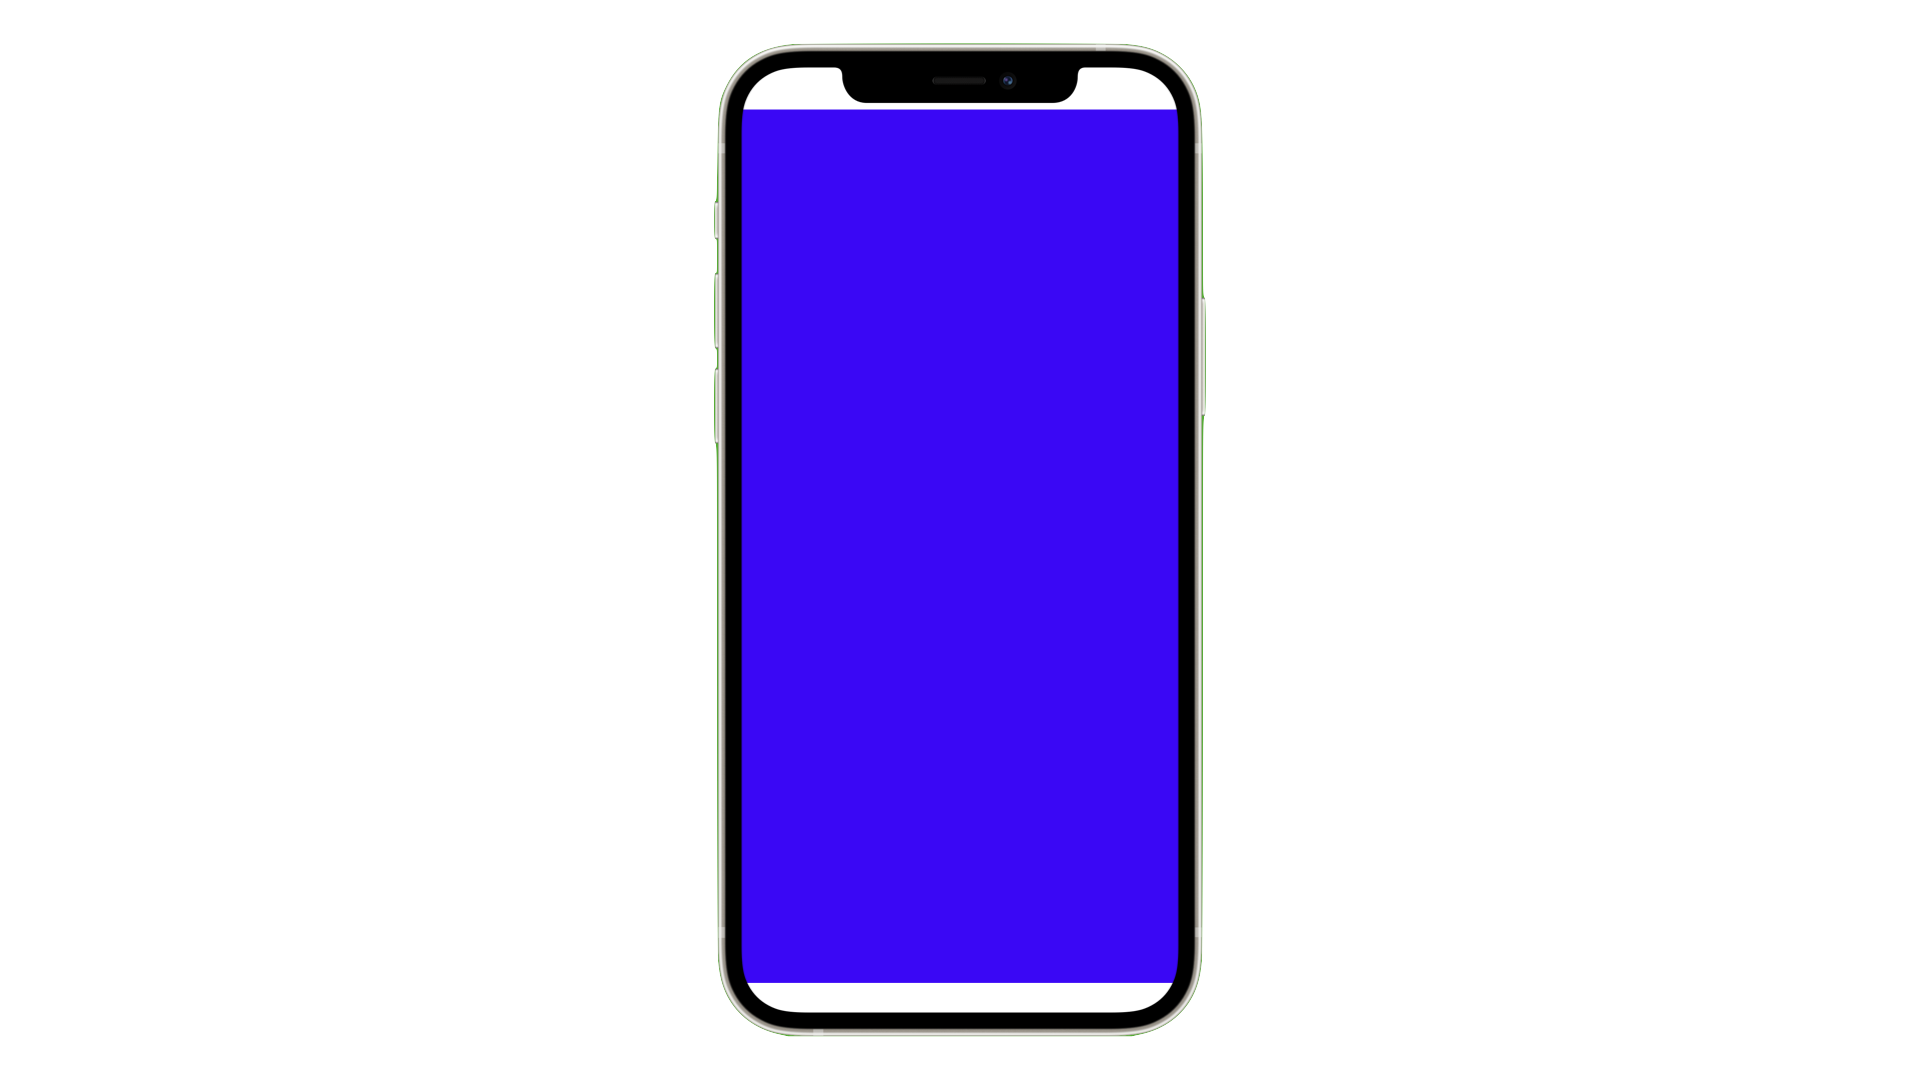
Views are rectangular areas on the screen. They are implemented with the UIView class in UIKit. Let’s say we have the reference rootView from the example above. When we run the app with the code above, we are going to see a white screen. In the background, the UIViewController is hosted in the SwiftUI view. Once the app starts this controller is called and it sets up its view rootView. By default, the root view takes up as much space on the screen as possible when we host the controller in SwiftUI.
Consequently, when we change the background colour to blue with
rootView.backgroundColor = UIColor.blue
the full screen appears blue, see figure 2. On the iPhone X and newer, as in figure 2, the safe areas are not changed by default. We will discuss this in more detail below.
We can create a hierarchy of views by for example layering them on top (z-axis) of each other. This is useful if you want to draw bounding boxes around detected objects in a live view. To illustrate this let’s overlay an orange view of smaller size on the blue view. We can add this subView with .addSubView.
let subView = UIView()
subView.backgroundColor = UIColor.orange

// Add subView to rootView
rootView.addSubview(subView)

// Print array of subviews
print(rootView.subviews)
However, the screen is still blue, not orange. The reason for this is that with the exception of the root view, all views by default have size 0x0 and are placed in the top left corner of the parent view. In the next section we will see how to work with the different coordinate systems to change that.
For further information regarding views, check out Apple’s documentation. But before we get to the coordinate systems, we have to talk about layers.
Layers
In the previous section we have seen how UIViews are used to define how data is presented on the screen. In iOS apps in general, rendering is handled by the Core Animation framework. Consequently, UIKit uses CALayer (Core Animation layer) objects to render its UIViews. Most operations such as positioning a view for example should be done on the view object. But there are cases where the layers should be manipulated directly such as drawing shapes on the screen.
We can get access to a view’s underlying layer like with view.layer:
let rootLayer = rootView.layer
Similar to views, we can create a layer hierarchy. For example, we can add a sublayer to the root layer:
// Create subLayer
var subLayer = CALayer()
subLayer.frame = CGRect(x: 10.0, y: 10.0, height: 200.0, width: 200.0)

// Add to rootLayer
rootLayer.addSubLayer(subLayer)
Note how we have specified the layer’s size and position with the .frame property. This is similar to how you would adjust a view. Let’s see how this works in more detail next.
Placing views and layers
As mentioned before, views and layers are of rectangular shape. Their size is described with a height and a width property. With the exception of a root view, all views have dimension 0x0 by default. Consequently, we have to adjust the size and position of a view after creating it. This can be accomplished with the properties .bounds, ‘.frame, and .center`.
In UIKit, every view can be defined either in the parent view’s coordinate system or in its own local one. All coordinate systems have their origin in the top-left corner of the view and extend towards the bottom right corner, see figure 3.
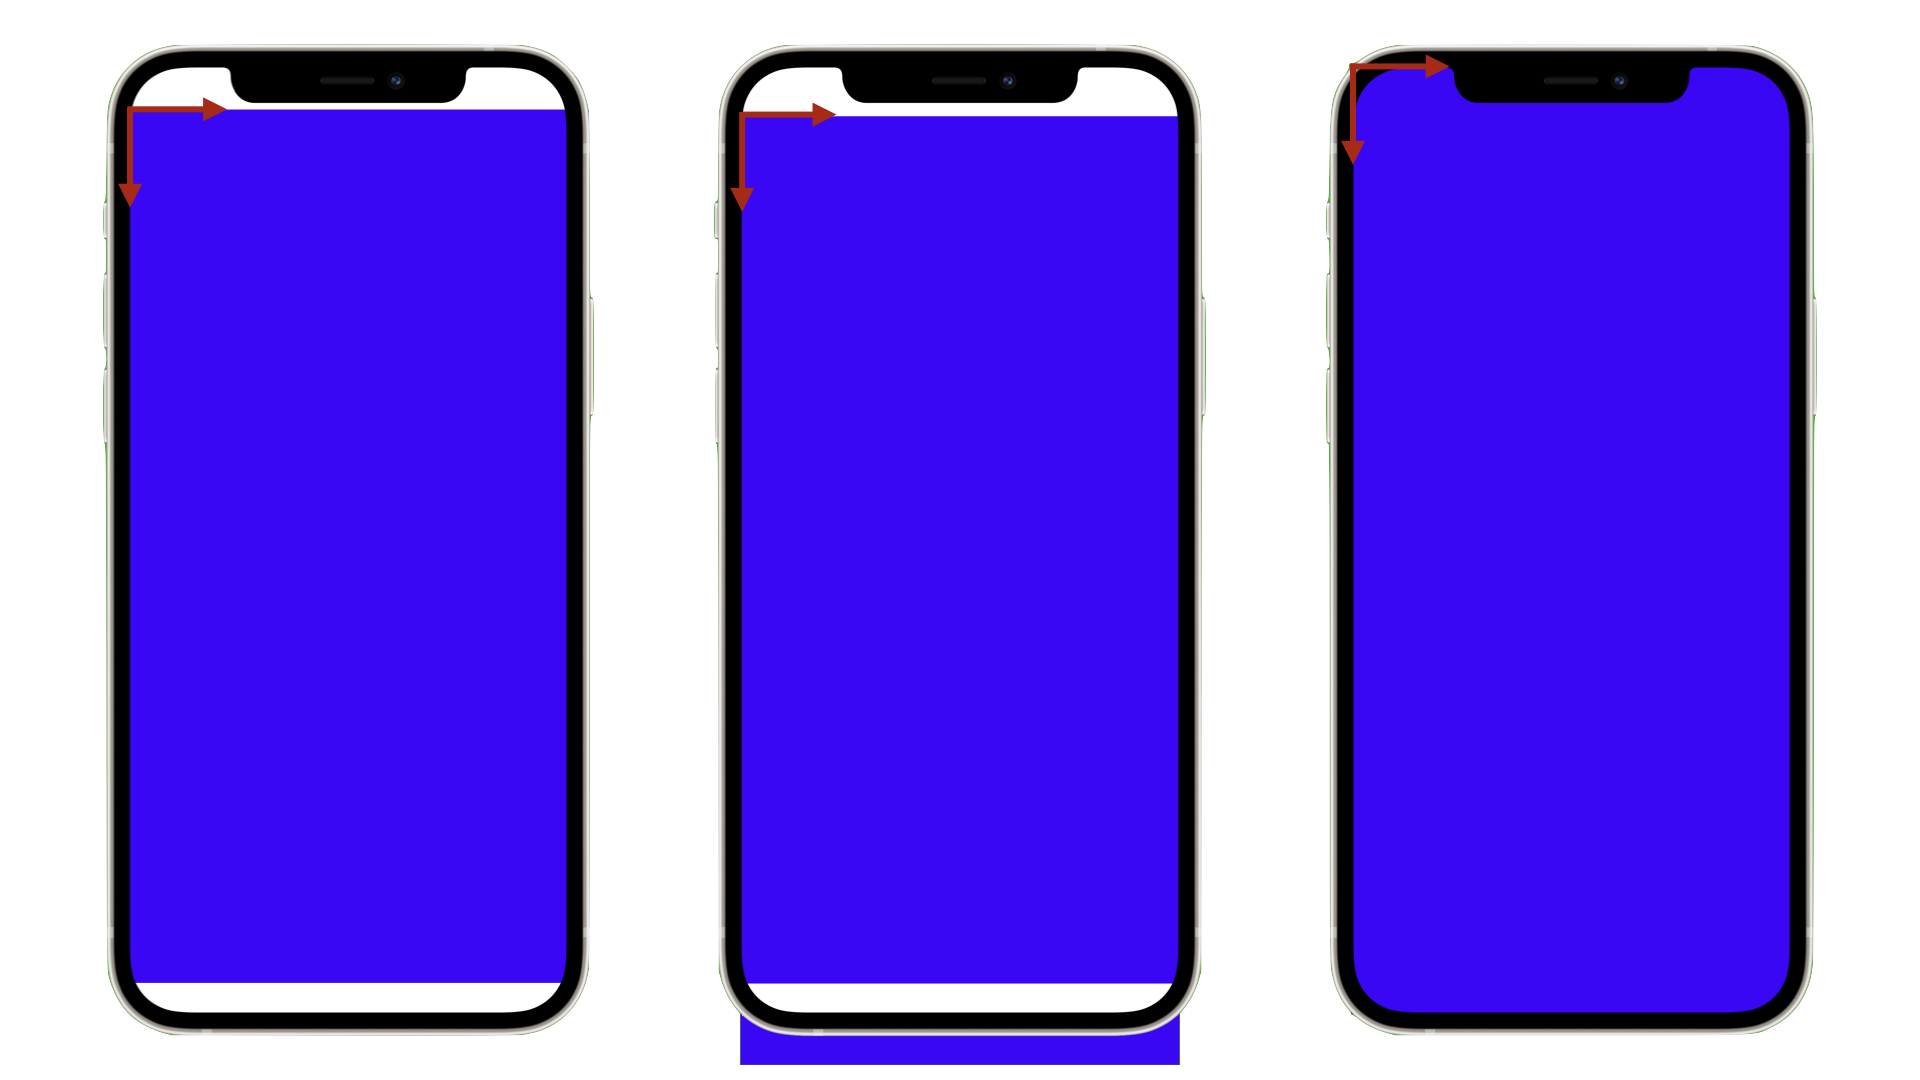
When hosting a view in SwiftUI there are some things to consider regarding the position and size. For iPhones with no home button, there are safe areas which by default are visible, see figure 3 left. If a top safe area is present, the view is positioned below it. Since the root view’s height is the full screen size by default, the view extends outside of the device’s bounds at the bottom. In contrast, the bottom safe area is overlaid with the view.
To see the full view we can ignore the safe areas:
struct ContentView: View {
  var body: some View {
    MyHostedViewController()
      .ignoreSafeAreas()
  }
}
This also moves the view to the top of the device, see right in figure 3. Below we discuss the size of these areas.
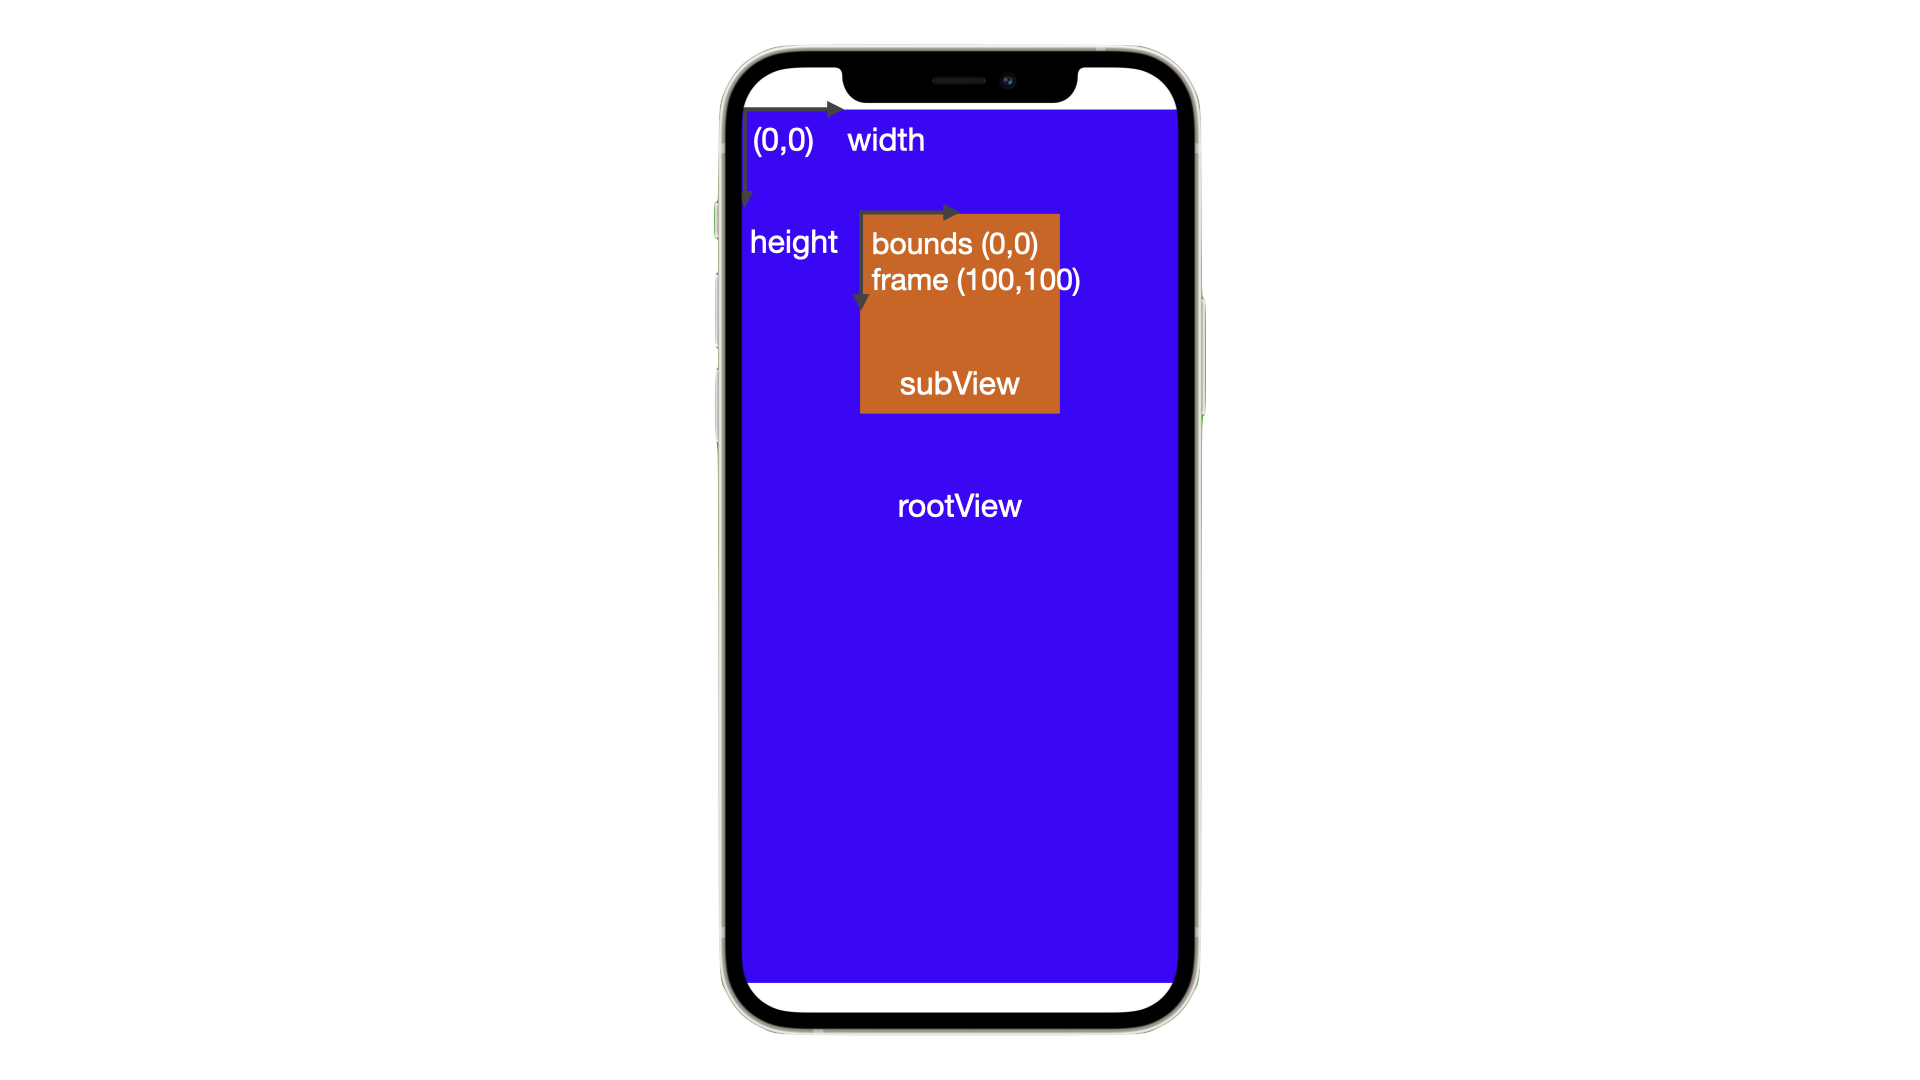
We can set the position and size in the parent view’s coordinate system with .frame. For example, if we add the following line to the code from above
subView.frame = CGRect(x: 100, y: 100, width: 200, height: 200)
we can finally see the orange subView as shown in figure 4. When we call
print(subView.bounds)
we get (0,0,200,200) because .bounds uses the view’s local coordinate system.
Points vs. Pixels
So far we have positioned two views on the screen. When we get the size of the root view
print(rootView.frame)
we get (0.0, 0.0, 390.0, 844.0). But the iPhone 13 Pro has a pixel resolution of 1170x2532 so why is the dimension different? The answer lies in how drawing works in UIKit. To accommodate different screen resolutions of different devices, view (and layer) coordinate systems work with points instead of pixels. Each device has a scaling factor which translates the point coordinate system into the device specific system in pixels. That way, if you have a device A with a specific resolution and device B with twice as many pixels, a line in an app appears to be of the same size if it gets scaled with factor 1.0 on device A and 2.0 on device B. For the iPhone 13 Pro this scaling factor is 3.0.
Safe Areas
As mentioned above, the presence of safe areas changes the available space for the views. The iPhone 12 and newer have a status bar area of height 47 points at the top and a bottom safe area of 34 points in portrait mode, see figure 5. In landscape orientation, these areas are different.
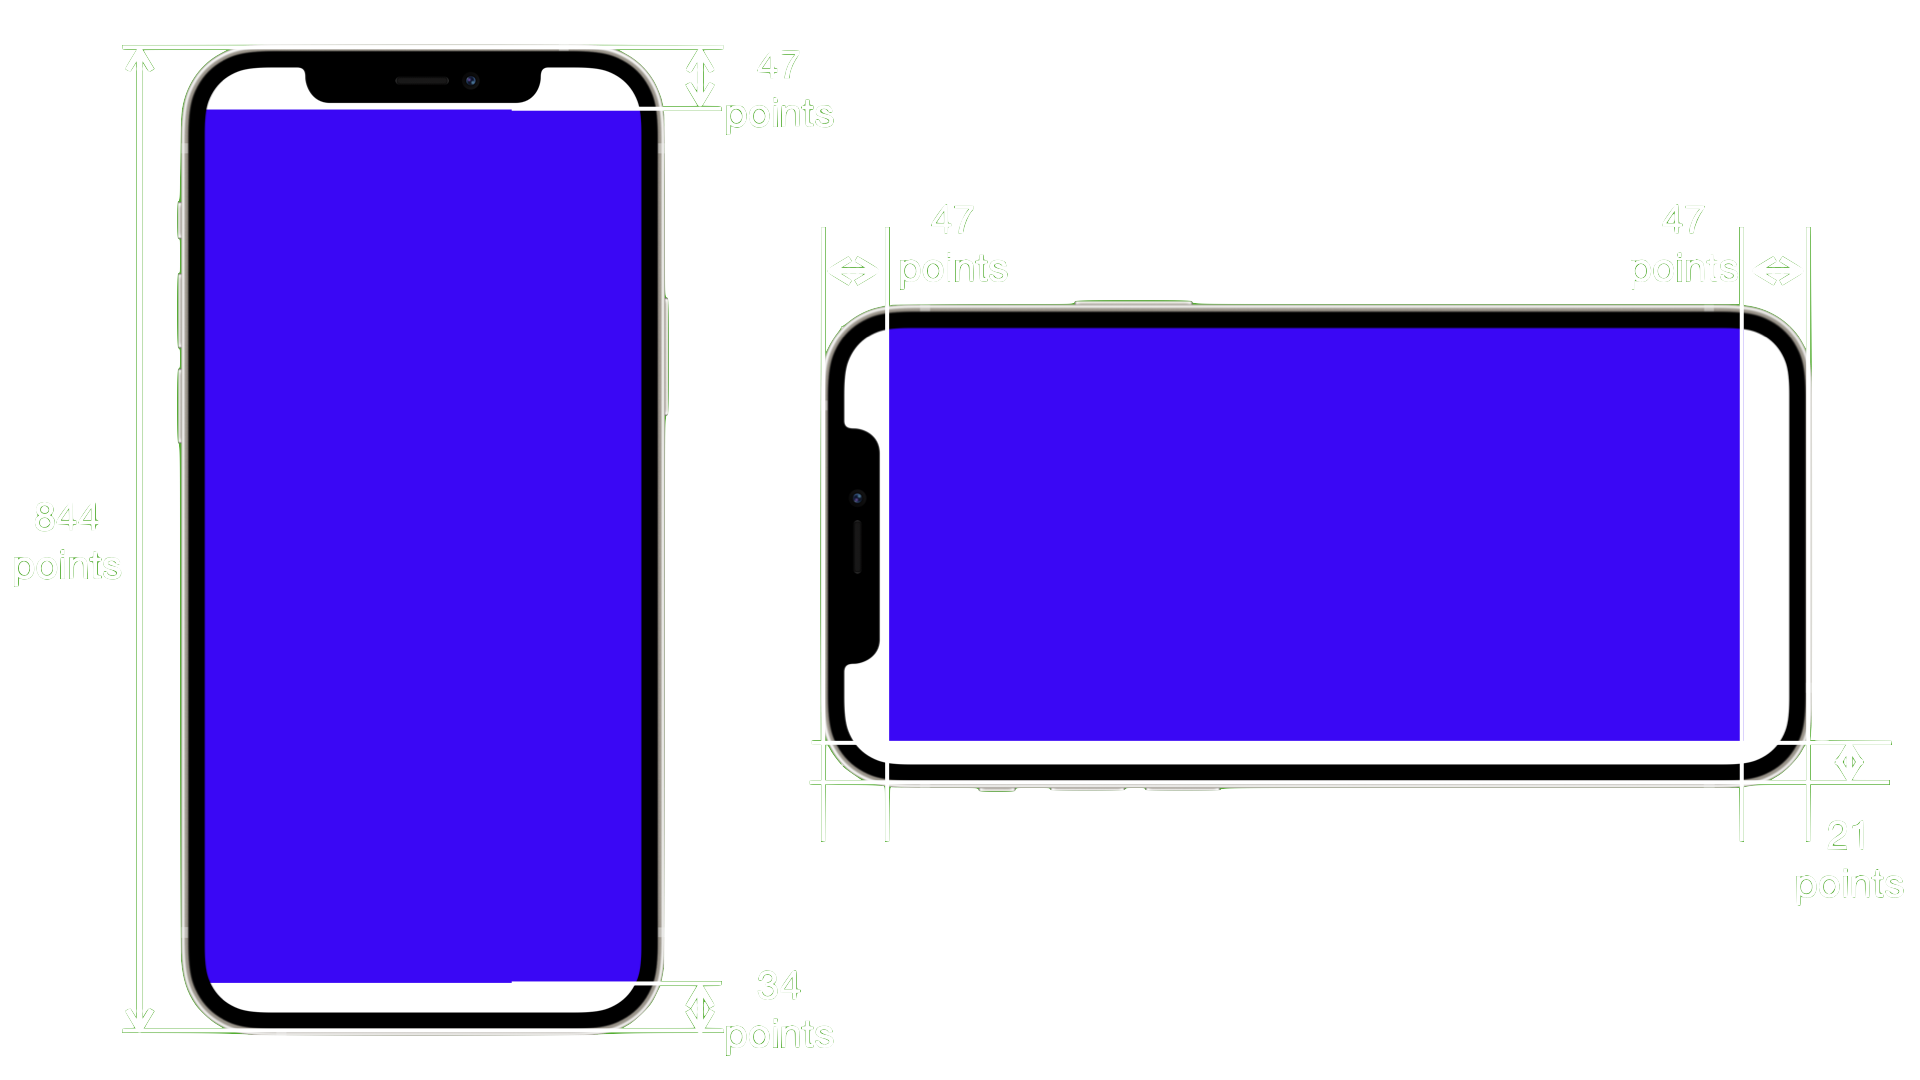
This means that the height of the rectangular space in points is actually reduced to 763 points from 844 without the safe areas.
Conclusion
We have seen how to use controllers and views to create interfaces with UIKit and that we can add those to SwiftUI apps. When adding a root view in SwiftUI, the size takes up the full screen, regardless of whether safe areas are present. To correctly place views we have explored the coordinate systems which we can use to position and adjust sizes of views.